Saturday, August 22, 2009

Get SPUsers From SharePoint PeoplePicker Control

Code below shows how to retrieve SPUsers from the SharePoint PeoplePicker control when PeoplePicker control is set to only allow users (SelectionSet="User"):
<SharePoint:PeopleEditor id="peoplePicker" runat="server" AllowEmpty="true" ValidatorEnabled="true" MultiSelect="true" SelectionSet="Group"/>
public static List<SPUser> GetPeopleEditorUsers(PeopleEditor picker)
{
List<SPUser> users = new List<SPUser>();
try
{
foreach (PickerEntity entity in picker.ResolvedEntities)
{
if ((string)entity.EntityData["PrincipalType"] == "User")
{
int userID = Int32.Parse(entity.EntityData["SPUserID"].ToString());
SPUser user = SPContext.Current.Web.SiteUsers.GetByID(userID);
if (user != null)
{
users.Add(user);
}
}
}
}
catch (Exception ex)
{
//Log error
}
return users;
}
The code needs to be revised a bit when groups are included in the PeoplePicker (SelectionSet="SPGroup,DL,SecGroup"):
public static List<SPUser> GetPeopleEditorGroupUsers(PeopleEditor picker)
{
List<SPUser> users = new List<SPUser>();
try
{
foreach (PickerEntity entity in picker.ResolvedEntities)
{
if ((string)entity.EntityData["PrincipalType"] == "SharePointGroup")
{
int groupID = int.Parse((string)entity.EntityData["SPGroupID"]);
SPGroup group = SPContext.Current.Web.SiteGroups.GetByID(groupID);
foreach (SPUser user in group.Users)
{
users.Add(user);
}
}
}
}
catch (Exception ex)
{
//Log error
}
return users;
}
The difference between SPWeb.Groups and SPWeb.SiteGroups:
  • SPWeb.Groups: Groups explicitly assigned persmissions in a site collection.
  • SPWeb.SiteGroups: All valid groups available in the site collection (superset of SPWeb.Groups). You can add a new group to SPWeb.SiteGroups, but not the SPWeb.Groups.

The difference between SPWeb.AllUsers, SPWeb.SiteUsers and SPWeb.Users:
  • SPWeb.Users: Users explicitly assigned permissions in a site collection.
  • SPWeb.SiteUsers: All valid users available in a site collection (superset of SPWeb.Users).
  • SPWeb.AllUsers: All users who are either members of the site or who have browsed to the site as authenticated members of a domain group in the site (superset of SPWeb.SiteUsers).

Monday, August 10, 2009

32 Character Limit Of SharePoint List's Internal Field Name

I came cross a weird problem and found this issue. A DateTime field with name of "KSNF WebPart Update Time" is used in a custom Feature, and I can get or set its value without any problem using SharePoint API:
DateTime updatetime = Convert.ToDateTime(item["KSNF WebPart Update Time"]);
But I got nothing when using CAML query. Yes, I use interal name of "KSNF_x0020_WebPart_x0020_Update_x0020_Time" in my CAML query, and it returns empty. I use SharePoint Manager to check this field and see that its internal static name is "KSNF_x0020_WebPart_x0020_Update_". It's trimmed to 32-character!

So SharePoint only allows 32-character in field's internal (static) name? I created a simply console application to test that:
using System;
using System.Collections.Generic;
using System.Text;
using Microsoft.SharePoint;

public partial class Program
{
static void Main(string[] args)
{
string siteName = "http://localhost";
string listName = "Shared Documents";
string fieldName = "ABCDEFGHIJKLMNOPQRSTUVWXYZabcdefghijklmnopqrstuvwxyz0123456789012345";

Console.WriteLine("Adding SPField to a SharePoint Document Library and a List with name of '{0}'", fieldName);
Console.WriteLine();
Console.WriteLine("Get SPField info from updated SharePoint Document Library:");
TestFieldName(siteName, listName, fieldName);
Console.WriteLine();

listName = "Announcements";
Console.WriteLine("Get SPField info from updated SharePoint List:");
TestFieldName(siteName, listName, fieldName);

Console.Read();
}

private static void TestFieldName(string siteName, string listName, string fieldName)
{
using (SPSite site = new SPSite(siteName))
{
using (SPWeb web = site.OpenWeb())
{
SPList list = web.Lists[listName];
if (!list.Fields.ContainsField(fieldName))
{
list.Fields.Add(fieldName, SPFieldType.Text, false);
list.Update();
}
if (list.Fields.ContainsField(fieldName))
{
SPField field = list.Fields[fieldName];
Console.WriteLine("Display name:\t'{0}' {1}Static name:\t'{2}'",
field.Title, System.Environment.NewLine, field.StaticName);

list.Fields.Delete(fieldName);
list.Update();
}
}
}
}
}
The result is:
Adding SPField to a SharePoint Document Library and a List with name of
'ABCDEFGHIJKLMNOPQRSTUVWXYZabcdefghijklmnopqrstuvwxyz0123456789012345'


Get SPField info from updated SharePoint Document Library:
Display name: 'ABCDEFGHIJKLMNOPQRSTUVWXYZabcdefghijklmnopqrstuvwxyz0123456789012345'
Static name: 'ABCDEFGHIJKLMNOPQRSTUVWXYZabcdefghijklmnopqrstuvwxyz0123456789012345'


Get SPField info from updated SharePoint List:
Display name: 'ABCDEFGHIJKLMNOPQRSTUVWXYZabcdefghijklmnopqrstuvwxyz0123456789012345'
Static name: 'ABCDEFGHIJKLMNOPQRSTUVWXYZabcdef'
Apparently the 32-character limit for internal field name only applies to SharePoint lists. There's no such limit for SharePoint document libraries.

Wednesday, July 29, 2009

Uploading File To SharePoint Document Library

Uploading a file to SharePoint 2007 (WSS 3.0 or MOSS 2007) Document Library is very simple. Also Content Types and template files can be associated with a Document library. so we can create a new item using template file. Following code demos how to upload a file to SharePoint Document library from local file system and from the template file stored in SharePoint:
using System;
using System.Collections.Generic;
using System.Text;
using System.IO;
using Microsoft.SharePoint;

class Program
{
static void Main(string[] args)
{
UploadFileToDocumentLibrary("http://localhost", "Shared Documents", @"c:\Test.doc");
InsertByTemplateFile("http://localhost", "Shared Documents", "Document");

Console.WriteLine("Done!");
Console.Read();
}

static void UploadFileToDocumentLibrary(string siteName, string listName, string fileName)
{
FileStream stream = File.OpenRead(fileName);
byte[] content = new byte[stream.Length];

stream.Read(content, 0, (int)stream.Length);
stream.Close();

using (SPSite site = new SPSite(siteName))
{
using (SPWeb web = site.OpenWeb())
{
SPDocumentLibrary lib = web.Lists[listName] as SPDocumentLibrary;

//string docUrl = lib.RootFolder.Url + "/testupload.docx";
//SPFile newDoc = lib.RootFolder.Files.Add(docUrl, content, true);
SPFile newDoc = lib.RootFolder.Files.Add("testUpload.doc", content, true);

SPListItem item = newDoc.Item;
item["Title"] = "Test uploading file";
item.Update();

}
}
}

static void InsertByTemplateFile(string siteName, string listName, string contentTypeName)
{
using (SPSite site = new SPSite(siteName))
{
using (SPWeb web = site.OpenWeb())
{
SPDocumentLibrary lib = web.Lists[listName] as SPDocumentLibrary;
SPContentType cType = lib.ContentTypes[contentTypeName];

SPFile cTypeTemplateFile = web.GetFile(cType.DocumentTemplateUrl);
byte[] content = cTypeTemplateFile.OpenBinary();

SPFile newDoc = lib.RootFolder.Files.Add("testTemplate.doc", content, true);

SPListItem item = newDoc.Item;
item["Title"] = "Test inserting by template file";
item["ContentTypeId"] = cType.Id;
item.Update();
}
}
}
}

Tuesday, July 14, 2009

Preserve System Fields When Copying SharePoint List Item

In previous post I explored the SharePoint List Item "Modified" field, which is considered as a system field. It will be exact the system time when the List item is created or updated. Sometimes we want to keep the original values of those fields when copying over List items, then we need to specifically assign those values. Following code snippet demos how to o preserve the original Created By, Created, Modified By and Modified fields:
        SPList origList = web.Lists.TryGetList("MyList");
        SPList newList = web.Lists.TryGetList("BackupList");
        foreach (SPListItem origItem in origList.Items)
        {
            SPListItem newItem = newList.Items.Add();
            newItem["Author"]   = origItem["Author"];   // Created By
            newItem["Created"]  = origItem["Created"];  // Created
            newItem["Editor"]   = origItem["Editor"];   // Modified By
            newItem["Modified"] = origItem["Modified"]; // Modified

            // Populate other fields

            newItem.Update();
        }

Friday, July 03, 2009

More On SharePoint Modified Field

I discussed the SharePoint "Modified" and "Last Modified" fields in my previous post. During the test I have an interesting finding on how update a list item will affect the "Modified" field. That's where this post is coming from.

In SharePoint there're two methods you can call to update a list item (SPListItem): SystemUpdate and Update. Following are their MSDN description(http://msdn.microsoft.com/en-us/library/ms438065.aspx):
  • SystemUpdate: Updates the database with changes that are made to the list item without changing the Modified or Modified By fields.
  • Update: Updates the database with changes that are made to the list item. (Overrides SPItem.Update().)
Obviously SystemUpdate method won't update the "Modified" field. What about the "Last Modified" field? Let's do a quick test:
public partial class Program
{
static void Main(string[] args)
{
string siteName = "http://localhost";
string listName = "Documents";
string itemInfo = string.Empty;

itemInfo = TestItemLastModifiedTime(siteName, listName, ExecutCommand.None);
Console.WriteLine("--Orignal--" + System.Environment.NewLine + itemInfo);
Console.WriteLine();

itemInfo = TestItemLastModifiedTime(siteName, listName, ExecutCommand.SystemUpdate);
Console.WriteLine("--After SystemUpdate--" + System.Environment.NewLine + itemInfo);
Console.WriteLine();
System.Threading.Thread.Sleep(2000);

itemInfo = TestItemLastModifiedTime(siteName, listName, ExecutCommand.Update);
Console.WriteLine("--After Update--" + System.Environment.NewLine + itemInfo);
Console.WriteLine();

Console.Read();
}

enum ExecutCommand
{
None,
SystemUpdate,
Update
}

private static string TestItemLastModifiedTime(string siteName, string listName, ExecutCommand command)
{
using (SPSite site = new SPSite(siteName))
{
using (SPWeb web = site.OpenWeb())
{
SPList list = web.Lists[listName];
SPListItem item = list.Items[0];
switch (command)
{
case ExecutCommand.None:
return GetModifiedInfo(item);
case ExecutCommand.SystemUpdate:
item["Title"] = item.Title.Trim();
item.SystemUpdate(true);
break;
case ExecutCommand.Update:
item["Title"] = item.Title.Trim();
if (item.File.CheckOutStatus == SPFile.SPCheckOutStatus.None)
item.File.CheckOut();
item.Update();
break;
default:
return string.Empty;
}
return GetModifiedInfo(item);
}
}
}

private static string GetModifiedInfo(SPListItem item)
{
DateTime modified = Convert.ToDateTime(item["Modified"]);
DateTime lastModified = Convert.ToDateTime(item["Last_x0020_Modified"]);
string newline = System.Environment.NewLine;
string msg = string.Format("SPListItem Modified: \t\t{0}{1}SPListItem LastModified: \t{2}",
modified.ToString("yyyy-MM-dd HH:mm:ss"), newline, lastModified.ToString("yyyy-MM-dd HH:mm:ss"));
return msg;
}
}
The result:
--Orignal--
SPListItem Modified: 2009-07-02 11:33:20
SPListItem LastModified: 2009-07-02 11:33:20

--After SystemUpdate--
SPListItem Modified: 2009-07-02 11:33:20
SPListItem LastModified: 2009-07-02 11:33:20

--After Update--
SPListItem Modified: 2009-07-03 21:15:16
SPListItem LastModified: 2009-07-02 11:33:20
It clearly shows that both SystemUpdate and Update Methods don't have any impact on "Last Modified" field.

All SharePoint data, including all version data, are stored in AllUserData table in the SharePoint backend content database. It looks like that both "Modified" and "Last Modified" time are from "tp_Modified" column in AllUserData table: "Modified" from the latest version while "Last Modified" from the last major version. You can verify this by checking the content database:
SELECT tp_Modified, tp_UIVersionString FROM AllUserData
WHERE tp_DirName = 'Documents' AND tp_LeafName = 'MyDocument1'
ORDER BY tp_Modified DESC

--return:
tp_Modified tp_UIVersionString
2009-07-02 11:33:20.000 5.1
2009-07-03 21:15:16.000 5.0
2009-06-15 17:33:59.000 4.1

Wednesday, July 01, 2009

SharePoint Modified Field And Last Modified Field

We know there's a "Modified" field in SharePoint that records the last modified time of a SPListItem. This field is viewable and you can add it to any SharePoint views. You will see the time of "Modified" field is change when you do an update on the list item.

There's another hidden "Modified" field, also known as "Last Modified" field with internal name of "Last_x0020_Modified". What's difference? Following are their official description from MSDN:
  • Modified: Identifies a field that contains the last modified date and time information that is associated with the specified SharePoint Foundation object.
  • Last_x0020_Modified: Identifies a field that contains version control information for the last modified version of the specified SharePoint Foundation list object.
The description looks not that clear. Which one should we use in our work? Let's examine them in details. First look at their field definition in C:\Program Files\Common Files\Microsoft Shared\Web Server Extensions\12\TEMPLATE\FEATURES\fields\fieldswss.xml:
   <Field ID="{28cf69c5-fa48-462a-b5cd-27b6f9d2bd5f}"
Name="Modified"
SourceID="http://schemas.microsoft.com/sharepoint/v3"
StaticName="Modified"
Group="_Hidden"
ColName="tp_Modified"
RowOrdinal="0"
ReadOnly="TRUE"
Type="DateTime"
DisplayName="$Resources:core,Modified;"
StorageTZ="TRUE">
</Field>
<Field ID="{173f76c8-aebd-446a-9bc9-769a2bd2c18f}"
Name="Last_x0020_Modified"
SourceID="http://schemas.microsoft.com/sharepoint/v3"
StaticName="Last_x0020_Modified"
Group="_Hidden"
ReadOnly="TRUE"
Hidden="TRUE"
DisplayName="$Resources:core,Modified;"
Type="Lookup"
List="Docs"
FieldRef="ID"
ShowField="TimeLastModified"
Format="TRUE"
JoinColName="DoclibRowId"
JoinRowOrdinal="0"
JoinType="INNER">
</Field>
Using SharePoint Manager we can see the raw "Modified" and "Last Modified" value (XML) stored in a list item:
    <?xml version="1.0" encoding="utf-16"?>
<z:row xmlns:z="#RowsetSchema"
ows_Modified="2009-06-15 11:23:13"
ows_Last_x0020_Modified="23;#2009-06-15 11:23:13"
... />
As we can see "Modified" field is of DateTime type and real DateTime is stored in SharePoint content database; on the other hand, "Last_x0020_Modified" field is a lookup column pointing to "Docs" list's "TimeLastModified" column.

With further investigation, I found that this "Docs" list and the "TimeLastModified" field do not really exist. They are virtual and the values are determinted at run time. I tried to figure out what SharePoint exactully is doing to obtain this lookup value. So I did a quick test on these two fields:
    public partial class Program
{
static void Main(string[] args)
{
string siteName = "http://localhost";
string listName = "Documents";
using (SPSite site = new SPSite(siteName))
{
using (SPWeb web = site.OpenWeb())
{
SPList list = web.Lists[listName];
DateTime modifiedTime, lastModifiedTime;

SPQuery query = new SPQuery();
query.ViewAttributes = "Scope='Recursive'";
query.ViewFields = "<FieldRef Name='Modified' Nullable='TRUE'/>"
+"<FieldRef Name='Last_x0020_Modified' Nullable='TRUE'/>";

SPListItemCollection items = list.GetItems(query);
modifiedTime = Convert.ToDateTime(items[0]["Modified"]);
lastModifiedTime = Convert.ToDateTime(items[0]["Last_x0020_Modified"]);
Console.WriteLine("Modified: " + lastModifiedTime.ToString()
+ " Last Modified: " + lastModifiedTime.ToString());
}
}
Console.Read();
}
}
The code is simple. I use CAML query to get the "Modified" and "Last Modified" data without any filter. I saw two quries sent to SharePoint content database for such CAML query. The first one is:

exec proc_GetListFields '2E1D8267-FBA0-4995-8CBB-08E747FB54D7','750DB8DD-A6AA-49B5-9D23-EB6E4B95EAD7'
Notice two GUIDs passing in this query do not match the ID of "Modified" or "Last Modified". The query returns:
    <FieldRef Name="ContentTypeId" />
<FieldRef Name="Title" ColName="nvarchar1" />
<FieldRef Name="_ModerationComments" ColName="ntext1" />
<FieldRef Name="File_x0020_Type" ColName="nvarchar2" />
<FieldRef Name="Name" ColName="nvarchar3" />
<FieldRef Name="EMail" ColName="nvarchar4" />
<FieldRef Name="Notes" ColName="ntext2" />
<FieldRef Name="SipAddress" ColName="nvarchar5" />
<FieldRef Name="Locale" ColName="int1" />
<FieldRef Name="CalendarType" ColName="int2" />
<FieldRef Name="AdjustHijriDays" ColName="int3" />
<FieldRef Name="TimeZone" ColName="int4" />
<FieldRef Name="Time24" ColName="bit1" />
<FieldRef Name="AltCalendarType" ColName="int5" />
<FieldRef Name="CalendarViewOptions" ColName="int6" />
<FieldRef Name="WorkDays" ColName="int7" />
<FieldRef Name="WorkDayStartHour" ColName="int8" />
<FieldRef Name="WorkDayEndHour" ColName="int9" />
<FieldRef Name="IsSiteAdmin" ColName="bit2" />
<FieldRef Name="Deleted" ColName="bit3" />
<FieldRef Name="Picture" ColName="nvarchar6" ColName2="nvarchar7" />
<FieldRef Name="Department" ColName="nvarchar8" />
<FieldRef Name="JobTitle" ColName="nvarchar9" />
<FieldRef Name="IsActive" ColName="bit4" />

The second query sent to database is massive:

exec sp_executesql N' SELECT TOP 2147483648 t2.[tp_Created] AS c3c8,t1.[Type] AS c0,t1.[TimeLastModified] AS c9,t3.[tp_ID] AS c10c5,CASE WHEN DATALENGTH(t1.DirName) = 0 THEN t1.LeafName WHEN DATALENGTH(t1.LeafName) = 0 THEN t1.DirName ELSE t1.DirName + N''/'' + t1.LeafName END AS c11,t1.[ScopeId] AS c16,UserData.[nvarchar4],UserData.[tp_CheckoutUserId],UserData.[tp_Version],t1.[Id] AS c15,t2.[nvarchar5] AS c3c7,t3.[nvarchar1] AS c10c4,UserData.[tp_HasCopyDestinations],UserData.[tp_ModerationStatus],UserData.[tp_Level],t2.[nvarchar1] AS c3c4,t2.[nvarchar4] AS c3c6,t3.[nvarchar4] AS c10c6,t3.[tp_Created] AS c10c8,t1.[MetaInfo] AS c14,t1.[LeafName] AS c2,UserData.[tp_Modified],UserData.[nvarchar3],t2.[tp_ID] AS c3c5,t3.[nvarchar5] AS c10c7,UserData.[tp_ID],t1.[ProgId] AS
c13,UserData.[tp_CopySource],t1.[TimeCreated] AS c1,UserData.[tp_Editor],t1.[IsCheckoutToLocal] AS c12 FROM UserData INNER MERGE JOIN Docs AS t1 WITH(NOLOCK) ON ( 1 = 1 AND UserData.[tp_RowOrdinal] = 0 AND t1.SiteId = UserData.tp_SiteId AND t1.SiteId = @L2 AND t1.DirName = UserData.tp_DirName AND t1.LeafName = UserData.tp_LeafName AND t1.Level = UserData.tp_Level AND (UserData.tp_Level = 255 AND t1.LTCheckoutUserId =@IU OR (UserData.tp_Level = 1 AND (UserData.tp_DraftOwnerId IS NULL OR (UserData.tp_DraftOwnerId <>@IU AND 1=0 )) OR UserData.tp_Level = 2 AND (UserData.tp_DraftOwnerId = @IU OR 1=1 )) AND (t1.LTCheckoutUserId IS NULL OR t1.LTCheckoutUserId <> @IU )) AND (1 = 1)) LEFT OUTER JOIN AllUserData AS t2 WITH(NOLOCK, INDEX=AllUserData_PK) ON (UserData.[tp_Editor]=t2.[tp_ID] AND UserData.[tp_RowOrdinal] = 0 AND t2.[tp_RowOrdinal] = 0 AND ( (t2.tp_IsCurrent = 1) ) AND t2.[tp_CalculatedVersion] = 0 AND t2.[tp_DeleteTransactionId] = 0x AND t2.tp_ListId = @L3 AND UserData.tp_ListId = @L4) LEFT OUTER JOIN AllUserData AS t3 WITH(NOLOCK, INDEX=AllUserData_PK) ON (UserData.[tp_CheckoutUserId]=t3.[tp_ID] AND UserData.[tp_RowOrdinal] = 0 AND t3.[tp_RowOrdinal] = 0 AND ( (t3.tp_IsCurrent = 1) ) AND t3.[tp_CalculatedVersion] = 0 AND t3.[tp_DeleteTransactionId] = 0x AND t3.tp_ListId = @L3 AND UserData.tp_ListId = @L4) WHERE (UserData.tp_Level= 255 AND UserData.tp_CheckoutUserId = @IU OR ( UserData.tp_Level = 2 AND UserData.tp_DraftOwnerId IS NOT NULL OR UserData.tp_Level = 1 AND UserData.tp_DraftOwnerId IS NULL ) AND ( UserData.tp_CheckoutUserId IS NULL OR UserData.tp_CheckoutUserId <> @IU)) AND UserData.tp_SiteId=@L2 AND (UserData.tp_DirName=@DN) AND UserData.tp_RowOrdinal=0 AND (t1.SiteId=@L2 AND (t1.DirName=@DN)) ORDER BY t1.[Type] Desc,UserData.[tp_ID] Asc OPTION (FORCE ORDER) ',N'@L0 uniqueidentifier,@L2 uniqueidentifier,@IU int,@L3 uniqueidentifier,@L4 uniqueidentifier,@DN nvarchar(260)',@L0='00000000-0000-0000-0000-000000000000',@L2='3640A558-D026-4ABF-BB7F-549ECA727EEC',@IU=3,@L3='750DB8DD-A6AA-49B5-9D23-EB6E4B95EAD7',@L4='EE1ADF17-47DB-4065-A8DC-8638E6903484',@DN=N'Documents'

I have to admit all that is just too magical for me to understand what's under the hood. So go with reflector, but I found it's even more complex than such a database query when I traced the code behind a CAML query from the SharePoint dll. Okay I gave up my path here. What I can do is to verify when the value of these two fields are different.

What I found is that all change on a list item conducted through UI would affect its "Modified" field immediately. Updating a list item by code is a different story. I will cover that in next post.

It looks like the "Last Modified" field is used internally by SharePoint itself. We should use "Modified" field in our logic to trace a list item's last modified time in general.

Monday, June 22, 2009

Windows Live Integration With ASP.NET

Windows Live ID Introduction

Similar to Facebook Connect (See previous article), Windows Live ID is also an authentication model with broader services available. It is a service that assigns cross-site identifiers to users throughout the Internet. From Microsoft’s definition: "The Windows Live ID service (formerly known as the Passport Network) is the identity and authentication system provided by Windows Live. More than 380 million users have credentials that work with Windows Live ID."

There are many Live services available from Microsoft using Windows Live ID. Microsoft have paid a lot of effort to consolidate all Live services in one platform called Live Framework (LiveFX), and offers an uniform way for programming Live Services from a variety of platforms, programming languages, applications and devices. For a simple contact sharing, there is no need to jump into LiveFX.

Three main Live SDKs are available for developers to integrate third-party applications with Live services:

The Windows Live ID Client 1.0 SDK makes it easy to start developing identity-aware client (desktop) applications.
The Windows Live ID Delegated Authentication SDK for Application Providers helps to get permission to access users' information on Windows Live services.
The Windows Live ID Web Authentication SDK provides a platform-independent interface and helps to authenticate users. This only offers distributed authentication without data sharing.

We will use the Windows Live ID Delegated Authentication SDK to access user’s contact list as an example.

There is an important consent concept for Live data access. The application requests data from Live service, Live service requires user to sign in, and will prompt user to grant the consent of data sharing. If user agrees to that, an encrypted consent token will be sent to the consent handler (channel file) in the application by query string, consent handler is able to decrypt the consent token because it knows the secret code generated during Live service registration (see next section for details). With a valid consent token, the application will have permission to access the Live service data. The detail of how it works is well described in http://msdn.microsoft.com/en-us/library/cc287613.aspx. Following figure illustrates the information flow of delegated authentication with consent token.
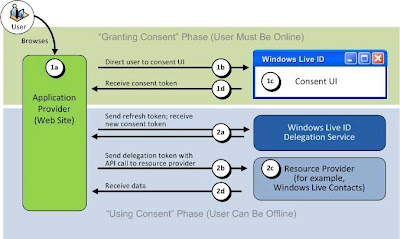

Note that all messages are passing through URL or client Cookies in above figure.

Register Windows Live Service

Like Facebook Connect, in order to user Windows Live Service, we need to register our application with Windows Live services which now is part of Azure services.

Go to http://lx.azure.microsoft.com, login with valid Windows Live ID, and there shows the Azure Services Developer Portal:
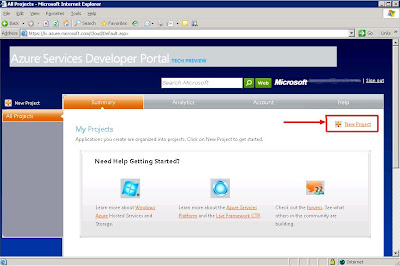

Click New project button and select Live Service Existing APIs. Then in the project creation page, input whatever project name and description, but make sure the Domain and Return URL are matching the application settings because they are used for cross domain call-back communication. Here we input windowslivetest.com as domain and http://windowslivetest.com/ as Return URL. Once click the Create button a new Windows Live application will be registered.

Remember Applicaiton ID and Secret key entries on the summary page are very important because we need to use them in our application to use the Windows Live service. We need to write them down and will put them in our web application configuration file web.config later.

At this point the Windows Live service registration for an application is completed. In next section we will build a simple web application to retrieve data from Windows Live service we just registered.

Getting Windows Live Data

After the registration on Windows Live service, we can build an application to consume Windows Live data. Here we create a web application to retrieve user's contact list and show the name and email for each contact on the page. For more details to use Windows Live server, refer to SDK samples and the Windows Live Data Interactive SDK (https://dev.live.com/livedata/sdk/Default.aspx).

Before creating the page, we need to copy the WindowsLiveLogin.cs file from SDK to our solution, which includes a helper class named WindowsLiveLogin.

We also need to create a few application settings in web.config file:
  <appSettings>
<!-- Windows Live Settings -->
<add key="wll_appid" value="000000004001710E"/>
<add key="wll_secret" value="yQvEotqjpxJPHW9jDAtc9ckepX2lZirK"/>
<add key="wll_securityalgorithm" value="wsignin1.0"/>
<add key="wll_returnurl" value="http://windowslivetest.com/WindowsLiveHandler.aspx" />
<add key="wll_policyurl" value="http://windowslivetest.com/LivePrivacy.htm" />
</appSettings>
Application ID and Secret come from the Windows Live service registration in previous section. The privacy page (LivePrivacy.htm) can be empty, and the channel file WindowsLiveHandler.aspx is for cross-domain communication. It is responsible for setting the consent token to cookie and redirecting to main page (no front end html content):
namespace Web
{
public partial class WindowsLiveHandler : System.Web.UI.Page
{
// Initialize the WindowsLiveLogin module.
static WindowsLiveLogin WLLogin = new WindowsLiveLogin(true);

protected void Page_Load(object sender, EventArgs e)
{
HttpRequest request = HttpContext.Current.Request;
HttpResponse response = HttpContext.Current.Response;

string appctx = "~/WindowsLiveTest.aspx";

string action = request["action"];

if (action == "delauth")
{
// Get the consent token
WindowsLiveLogin.ConsentToken ct = WLLogin.ProcessConsent(request.Form);
HttpCookie authCookie = new HttpCookie("delauthtoken");
if (ct != null)
{
authCookie.Value = ct.Token;
authCookie.Expires = DateTime.Now.AddYears(10);
}
else
{
authCookie.Expires = DateTime.Now.AddYears(-10);
}

response.Cookies.Add(authCookie);
response.Redirect(appctx);
response.End();
}
else
{
response.Redirect(appctx);
response.End();
}
}
}
}
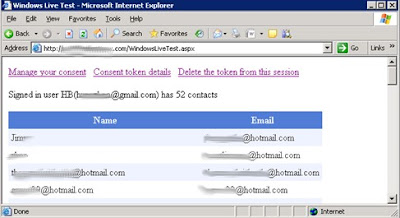
The main page (WindowsLiveTest.aspx) checks the consent token from cookie. If the token is valid, it will connect to the Windows Live service with the consent token, parse the XML return using Linq to XML, and show the contacts’ name and email in a GridView:
namespace Web
{
public partial class _WindowsLive : System.Web.UI.Page
{
// Initialize the WindowsLiveLogin module.
static WindowsLiveLogin wll = new WindowsLiveLogin(true);
protected WindowsLiveLogin.ConsentToken ConsentToken = null;

/// <summary>
/// Handles the page load event
/// </summary>
protected void Page_Load(object sender, EventArgs e)
{
HttpCookie authCookie = HttpContext.Current.Request.Cookies["delauthtoken"];

// If the raw consent token has been cached in a site cookie,
// process it and extract the consent token.
if (authCookie != null)
{
string t = authCookie.Value;
ConsentToken = wll.ProcessConsentToken(t);

if ((ConsentToken != null) && !ConsentToken.IsValid())
{
ConsentToken = null;
return;
}

string uri = "https://livecontacts.services.live.com/users/@L@" +
ConsentToken.LocationID + "/rest/LiveContacts";

HttpWebRequest request = (HttpWebRequest)WebRequest.Create(uri);
request.ContentType = "application/xml; charset=utf-8";
request.Method = "GET";

// Add the delegation token to a request header.
request.Headers.Add("Authorization", "DelegatedToken dt=\"" + ConsentToken.DelegationToken + "\"");

//Issue the HTTP GET request to Windows Live Contacts.
HttpWebResponse response = (HttpWebResponse)request.GetResponse();

// Create XDocument by returned XML
StreamReader readStream = new StreamReader(
response.GetResponseStream(), System.Text.Encoding.UTF8);
XmlReader xmlReader = XmlReader.Create(readStream);
XDocument xDoc = XDocument.Load(xmlReader);
response.Close();

// Summary format:
//Signed in user {username}({email}) has {count} contacts
if (xDoc.Descendants("Owner").Elements("WindowsLiveID").Any())
{
string userInfo = string.Format(
"<p>Signed in user {0}({1}) has {2} contacts</p>",
xDoc.Descendants("Owner").Elements("Profiles").Elements("Personal").Elements("DisplayName").Any() ?
xDoc.Descendants("Owner").Elements("Profiles").Elements("Personal").Elements("DisplayName").First().Value : "",
xDoc.Descendants("Owner").Elements("WindowsLiveID").First(),
xDoc.Descendants("Contact").Count());

lblUserInfo.Text = userInfo;
}

// Query contact display name and email address
var contacts = from contact in xDoc.Descendants("Contact")
select new
{
Name = contact.Elements("Profiles").Elements("Personal").Elements("DisplayName").Any() ?
contact.Element("Profiles").Element("Personal").Element("DisplayName").Value : string.Empty,
Email = contact.Elements("Emails").Elements("Email").Elements("Address").Any() ?
contact.Element("Emails").Element("Email").Element("Address").Value : string.Empty
};

// Bind list of display name and email address to GridView
GridView1.DataSource = contacts;
GridView1.DataBind();
divConsent.Visible = true;
}
else
{
string appSite = "https://" + Request.Url.Host;
string delegationURL = wll.GetConsentUrl("ContactsSync.FullSync");
string grantLink = string.Format("<a href='" + delegationURL +
"'>Click to grant this application access to your Windows Live data</a>", appSite);
Page.Response.Write(grantLink);
}
}
}
}
The page's html markup:
<%@ Page Language="C#" AutoEventWireup="true" CodeBehind="WindowsLiveTest.aspx.cs" Inherits="Web._WindowsLive" %>
<!DOCTYPE HTML PUBLIC "-//W3C//DTD HTML 4.01 Transitional//EN">
<html>
<head>
<title>Windows Live Test</title>
<script src="Scripts/jquery-1.3.2.min.js" type="text/javascript"></script>
<script type="text/javascript">
$(document).ready(function() {
$("#tblConsentDetail").hide()
});
function toggleConsentDetail() {
$(
"#tblConsentDetail").toggle();
}
</script>
</head>
<body>
<form id="form1" runat="server">
<div id="divConsent" runat="server" visible="false">
<a href="https://consent.live.com/ManageConsent.aspx">Manage your consent</a>&nbsp;&nbsp;
<a href="#" onclick="javascript:toggleConsentDetail();">Consent Token Details</a>&nbsp;&nbsp;
<a href="WindowsLiveHandler.aspx?action=delauth" >Delete the token from this session</a><br />
<asp:Label ID="lblUserInfo" runat="server"></asp:Label>
<table id="tblConsentDetail" cellpadding="5">
<tr valign="top"><td style="width:300px;">LID</td><td>
<%=ConsentToken.LocationID%></td></tr>
<tr valign="top"><td>Delegation token</td><td>
<%=ConsentToken.DelegationToken%></td></tr>
<tr valign="top"><td>Refresh token</td><td>
<%=ConsentToken.RefreshToken%></td></tr>
<tr valign="top"><td>Expiry</td><td>
<%=ConsentToken.Expiry%></td></tr>
<tr valign="top"><td>Offers</td><td>
<%=ConsentToken.OffersString%></td></tr>
<tr valign="top"><td>Context</td><td>
<%=ConsentToken.Context%></td></tr>
<tr valign="top"><td>Token</td><td>
<%=ConsentToken.Token%></td></tr>
</table>
</div>
<br />
<asp:GridView ID="GridView1" runat="server" GridLines="None" CellPadding="5" ForeColor="#333333" >
<RowStyle BackColor="#EFF3FB" />
<FooterStyle BackColor="#507CD1" Font-Bold="True" ForeColor="White" />
<PagerStyle BackColor="#2461BF" ForeColor="White" HorizontalAlign="Center" />
<EmptyDataTemplate>
<asp:Label ID="Label1" runat="server">There are no contacts</asp:Label>
</EmptyDataTemplate>
<SelectedRowStyle BackColor="#D1DDF1" Font-Bold="True" ForeColor="#333333" />
<HeaderStyle BackColor="#507CD1" Font-Bold="True" ForeColor="White" />
<EditRowStyle BackColor="#2461BF" />
<AlternatingRowStyle BackColor="White" />
</asp:GridView>
</form>
</body>
</html>
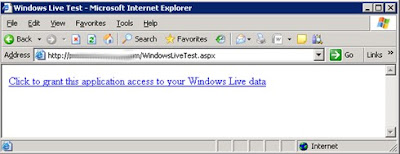
There is no consent token available when we first visit the page, and the grant access like is displayed:
Click the link page will be redirected to the Windows Live login page:
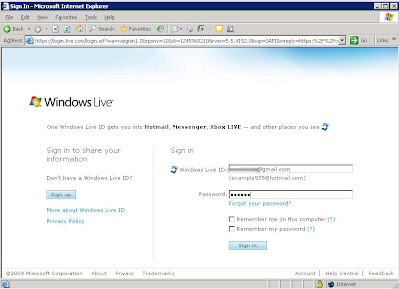
After input valid Windows Live ID and password, an agreement page pops up to let user to confirm the data sharing:
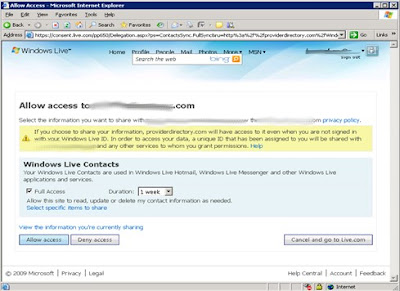
When user clicks the Allow access button, page will direct to our test page (underneath the channel page is called back first). Since the consent token now is available, the test page will show user’s contact:
When the delegated authentication doesn’t work properly, first thing to diagnose the issue is check the error code inside the URL, and look up the details of the error from Live SDK error list page: http://msdn.microsoft.com/en-us/library/cc287686.aspx.

Using Windows Live Contacts Control

In addition to Windows Live service SDK(API), the Windows Live Contacts Control (Beta) (http://dev.live.com/contactscontrol/) abstracts the related functions into a HTML control and makes the whole Windows Live contact sharing much easier to use.

Windows Live Contacts Control does not require registering with Windows Live service, which significantly simplifies the contact import. Just reference two JavaScript files from Windows Live, and declare the Contacts control on an html or aspx page as following:
<!DOCTYPE html PUBLIC "-//W3C//DTD XHTML 1.0 Transitional//EN" "http://www.w3.org/TR/xhtml1/DTD/xhtml1-transitional.dtd">
<html xmlns="http://www.w3.org/1999/xhtml" xmlns:devlive="http://dev.live.com">
<head>
<title>Windows Live Contacts Control Test</title>
<script type="text/javascript" src="https://controls.services.live.com/scripts/base/v0.3/live.js"></script>
<script type="text/javascript" src="https://controls.services.live.com/scripts/base/v0.3/controls.js"></script>
<script type="text/javascript">
function receiveData(contacts) {
var s = "<p>" + contacts.length + " contacts are imported:</p>";
for (var i = 0; i < contacts.length; i++) {
s += "<p>Contact " + (i+1) + "<br>";
for (var j in contacts[i]) {
s += escapeString(j) +
": " + escapeString(contacts[i][j]) + "<br>";
}
s +=
"</p>";
}
document.getElementById('divStatus').innerHTML = s;
}
function signin() {
document.getElementById('divStatus').innerHTML =
"You're logged in!";
};

function signout() {
document.getElementById('divStatus').innerHTML =
"You need to log in.";
};
function showerror(msg) {
document.getElementById('divStatus').innerHTML = escapeString(msg);
}
function escapeString(str) {
return str.replace(/&/g,
"&amp;").replace(/</g, "&lt;").replace(/>/g, "&gt;").
replace(/\"/g,
"&quot;").replace(/\'/g, "&#39;");
}
function controlLoad() {
document.getElementById('divStatus').innerHTML =
"You need to log in.";
}
</script>
</head>
<body>
<P>Windows Live Contacts Control Test</P>
<devlive:contactscontrol
style="width:280px;height:400px;float:left;margin-right:10px;"
id="ContactsControl"
devlive:privacyStatementURL="LivePrivacy.htm"
devlive:dataDesired="name,firstname,lastname,email,emailpersonal,emailbusiness"
devlive:onData="receiveData"
devlive:onSignin="{signin();}"
devlive:onSignout="{signout();}"
devlive:onError="showerror"
devlive:channelEndpointURL="LiveChannel.htm"
devlive:"controlLoad">
</devlive:contactscontrol>
<div id="divStatus"></div>
</body>
</html>
The property and event description of Windows Live Contacts Control is available in http://dev.live.com/contactscontrol/api.aspx. The channel page for cross domain communication is also required. In above case, we create a LiveChannel.htm page:
 <html xmlns="http://www.w3.org/1999/xhtml">
<head>
<title>Channel</title>
<meta name="ROBOTS" content="NONE" />
<script type="text/javascript">
function doc_loaded() {
try {
var hash = window.location.hash.substr(1);
if (window.location.replace == null)
window.location.replace = window.location.assign;
window.location.replace("about:blank");
var name = hash.split("/")[0];
var win = null;
if (name)
win = window.parent.frames[name];
else
win = window.parent.parent;
win.Microsoft.Live.Channels.Mux._recv_chunk(hash);
}
catch (ex) {
/* ignore */
}
}
</script>
</head>
<body onload="doc_loaded()">
</body>
</html>
An empty window similar to Windows Messenger is displayed when the page is first loaded. You click on Signin, and when the login is successful, the popup window will close automatically and the user’s contacts will show on the control:
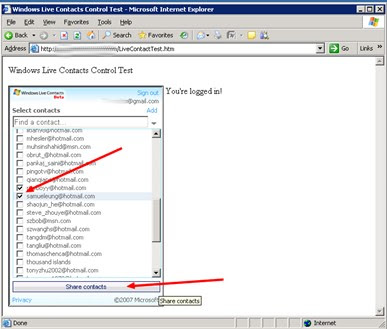
You can select the contacts needed to be shared, and click the Share contacts button inside the control, and then an agreement page will pop up asking the user to confirm the data sharing:
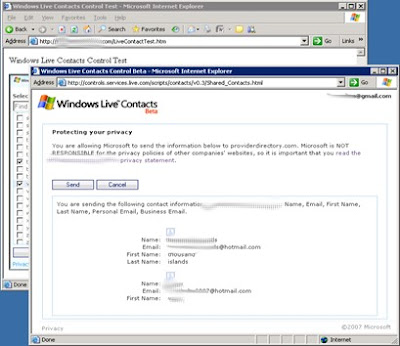
The popup page will close when user clicks Send button, and the contacts are imported to the page hosting the control:
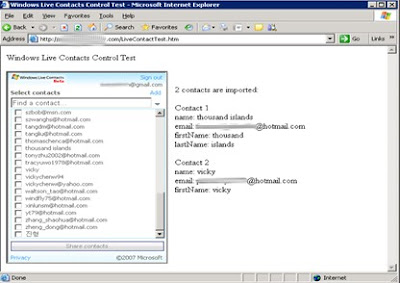

The Windows Live Contacts Control is handy to import email addresses. But be aware that the control is still in Beta phase, and its interface could be changed later.

Known Issues

The local time stamp of browser machine is sent in the request URL for a delegated Live authentication service. Syncing the time of development machine is important for testing. Nowadays many developers are using virtual machine as a development platform, as virtual machines are flexible, easy to maintain and test. But be cautious that virtual machines’ time may not be correct if they are manually turned off and on. The Live services will fail if time variance between servers for Live services and the client machine is too much.

Windows Live ID is upgraded from previous Passport services. It’s still in early 1.0 version, and some of the Live APIs are actually in Beta phase. The bigger picture of Microsoft Azure services have just jumped to the stage in less than a year. I did encounter the unstable services during the tests.

Windows Live Web Authentication API currently is totally separated from Delegated Authentication API. Logging out of Windows Live is a basic function defined in We Authentication but not in Delegated Authentication service. The page will be redirected to http://www.msn.com instead of original application page, if we use the same Web Authentication logout URL in Delegated Authentication.
The workaround to the logout problem can be making a cross domain AJAX call (such as getJSON in jQuery) to the logout URL, or create an invisible iframe for the logout call:
    <script type="text/javascript">
function logoutLive() {
var $frame = $("<iframe width='1px' height='1px'
src='http://login.live.com/logout.srf?appid=<%=LiveAPPID %>'>"
);
$('#divContent').append($frame);
$.cookie('delauthtoken', null);
location.reload();
}
</script>
<body>
<form id="form1" runat="server">
<div id="divContent">
<a href="javascript:logoutLive();">Logout Live</a>
</div>
</form>
</body>

Conclusion

Windows Live integeration works but it seems not as easy/stable as Facebook Live.

Wednesday, June 03, 2009

Facebook Connect With ASP.NET

What is Facebook Connect

Facebook Connect, first released in May 2008, is the latest Facebook Platform for development Facebook applications. It is basically a series of libraries to enable any website to allow a user to log into Facebook, and retrieve the user’s data such as profile and friends from Facebook. Two major functions provided by Facebook Connect are delegated authentication and data sharing for authenticated users.

In this article I will examine how Facebook Connect works and create some demo pages to connect Facebook.

Under the Hood of Facebook Connect: Secure Cross Domain Communication

By design, web browsers isolate pages in different domains to prevent them from peeking at each other for security consideration. This isolation model ensures websites only accessing data from their own servers. This becomes a barrier for advanced web applications that need to aggregate data from multiple domains.

Windows Live development team in Microsoft first presented the concept of Secure Cross Domain Communication using secure channel in nested iframes (http://msdn.microsoft.com/en-us/library/bb735305.aspx). The idea is that the application page (http://www.application.com/CrossDomainLogin.htm) includes an iframe (A) to connect third-party page in different domain like Facebook authentication page (http://www.facebook.com/extern/login.php), and embeds an extra iframe (B) inside iframe (A) where iframe B is in the same application domain. The result from third-party page (iframe A) can be passed to iframe A as a hash in URL, like iframeB.src=”http://www.application.com/Receiver.htm#ResultData”. Within Receiver.htm, onload JavaScript can send result data back to parent’s (iframe A) parent (CrossDomainLogin.htm) because they are in the same domain. Here the iframe B is the channel and bridge for cross domain communication. The approach is soon adopted by many developers and vendors. Facebook Connect uses the same mechanism in its implementation, refer to http://wiki.developers.facebook.com/index.php/Cross_Domain_Communication and http://wiki.developers.facebook.com/index.php/How_Connect_Authentication_Works for details. Instruction of building a Facebook Connect application is available in http://wiki.developers.facebook.com/index.php/Trying_Out_Facebook_Connect.

Register Application with Facebook Developer

A new Facebook Application is required for building any Facebook Connect website. To setup the Facebook Application, first thing is to login to Facebook and Facebook Developer Application (http://www.facebook.com/developers/), and allow the Developer access:


Type Application Name “MyFacebookConnect” and click Save and the Edit Application page will show up. The Application ID, API Key and Secret on the page base section are important and they are required for website to connect to Facebook.

Select the Connect section of the edit page, type url that you will use to connect Facebook, “http://myfacebookconnect.com” in our case. Also we input the myfacebookconnect.com as the Base Domain.

Click Save Changes, and then a new Facebook Application named “myfacebookconnect” is created, and summary page comes up showing the related data and links of the application. Now we are ready to build our website that will use Facebook Connect to login and pull out data from Facebook.

Note that in order to make the application work in development environment; we need to modify hosts entry so that the myfacebookconnect.com is pointing to local host. Add following to the hosts file located in “C:\WINDOWS\system32\drivers\etc\hosts”:
127.0.0.1 localhost
127.0.0.1 myfacebookconnect.com
Also the web application can only run in IIS, and the cross domain communication won’t work properly in Visual Studio embedded web server where a dynamic port number is used.

Simple Page Connect to Facebook

As we mentioned before, a channel page is required for cross domain communication. We create an html page named xd_receiver.htm under the ASP.NET solution:
<!DOCTYPE html PUBLIC "-//W3C//DTD XHTML 1.0 Strict//EN" "http://www.w3.org/TR/xhtml1/DTD/xhtml1-strict.dtd">
<html xmlns="http://www.w3.org/1999/xhtml">
<body>
<script src="http://static.ak.connect.facebook.com/js/api_lib/v0.4/XdCommReceiver.js"
type="text/javascript"></script>
</body>
</html>
The page only references a JavaScript from Facebook without any other html tags. The JavaScript is the way Facebook Connect applications talk to Facebook servers, no matter the applications are using PHP, Java or .NET.

For a simple test purpose, we create a facebooktest.htm page that shows login status:
<!DOCTYPE html PUBLIC "-//W3C//DTD XHTML 1.0 Transitional//EN"
"http://www.w3.org/TR/xhtml1/DTD/xhtml1-transitional.dtd">
<html xmlns="http://www.w3.org/1999/xhtml">
<body>
<script src="http://static.ak.connect.facebook.com/js/api_lib/v0.4/FeatureLoader.js.php"
type="text/javascript"></script>
<form>
<div>
<fb:login-button onlogin="window.location.reload()">
</fb:login-button> <div id="status"></div>
</div>
</form>

<script type="text/javascript">
function showLogin() {
document.getElementById("status").innerHTML = "You are logged in";
}
function showLogout() {
document.getElementById("status").innerHTML = "You are logged out";
}
FB.init("f81522f787ba594e567ec85424d513b5", "xd_receiver.htm",
{ "ifUserConnected": showLogin, "ifUserNotConnected": showLogout });
</script>
</body>
</html>
The Facebook Connect JavaScript library is loaded before the Form elements are created. The <fb:login-button> is the login button control for logging in to Facebook. The JavaScript call FB.init is invoked at the end of page. The init method takes three parameters, first is the Facebook Appplication API Key we saw previously during the Facebook Application setup, the second parameter is the cross domain channel file we just created, the last parameter is anonymous method (call back function) to invoke showLogin and showLogout status based on the return value of init call.

The page shows “You are logged out” when it’s first loaded. The Facebook login page pops up when the Facebook Connect button is clicked:


Type a valid email and password, and click Connect button, the popup will be closed and the facebooktest.htm page is refreshed. Now the status is changed to being logged in:


Retrieve Facebook Friend List

After a user logging in the Facebook Connect, the application has the capability to retrieve user’s profile and other information.

In this example, we create an ASP.NET application to display Facebook friend list with login and logout functions. To make the work simpler, we use open source .NET Facebook Developer Toolkit (http://www.codeplex.com/FacebookToolkit) to pull out data from Facebook instead of using Facebook API (JavaScript) for data retrieval. The usage of Facebook Developer Toolkit is simple; just download the facebook.dll and Microsoft.Xml.Schema.Linq.dll from the website, save them to the application bin folder, and add them to the application references.

First we put the Facebook API key and Secret in web.config:
<appSettings>
<add key="facebook.APIKey" value="f81522f787ba594e567ec85424d513b5"/>
<add key="facebook.Secret" value="1426a4ce7cb9be28b6cc927109ef2afa"/>
</appSettings>
We then create an ASP.NET page named FacebookTest.aspx as following:
<%@ Page Language="C#" AutoEventWireup="true" CodeBehind="FacebookTest.aspx.cs" Inherits="Web.FacebookTest" %>

<!DOCTYPE html PUBLIC "-//W3C//DTD XHTML 1.0 Transitional//EN"
"http://www.w3.org/TR/xhtml1/DTD/xhtml1-transitional.dtd">
<html xmlns="http://www.w3.org/1999/xhtml" xmlns:fb="http://www.facebook.com/2008/fbml">
<head id="Head1" runat="server">
<title>Facebook Connect Test</title>
<style type="text/css">
.friendlist li
{
display: inline;
float: left;
margin-left: 5px;
margin-bottom: 5px;
}
</style>
</head>
<body>
<script src=http://static.ak.connect.facebook.com/js/api_lib/v0.4/FeatureLoader.js.php
type="text/javascript"></script>

<form id="form1" runat="server">
<div>
<p><asp:Label ID="lblLoginStatus" runat="server"></asp:Label></p>
<p>
<div runat="server" id="divLogin">
<fb:login-button onlogin="window.location.reload()"></fb:login-button>
</div>

<div runat="server" id="divLogout">
<a href="#" onclick="FB.Connect.logoutAndRedirect('FacebookTest.aspx');">
<img src="http://static.ak.fbcdn.net/images/fbconnect/logout-buttons/logout_small.gif" />
</a>
</div>
</p>
<asp:Label ID="lblFriendCount" runat="server"></asp:Label>
<asp:ListView ID="ListView1" runat="server">
<LayoutTemplate>
<ul class="friendlist">
<asp:PlaceHolder ID="itemPlaceholder" runat="server" />
</ul>
</LayoutTemplate>
<ItemTemplate>
<li><img src='<%#Eval("imgURL") %>' width="75" height="75" /> <br/> <%#Eval("name") %></li>
</ItemTemplate>
</asp:ListView>
</div>
</form>

<script type="text/javascript">
FB.init("ecf025f742453d4253eb40b074049b7a", "xd_receiver.htm");
</script>
</body>
</html>
The XML namespace
<html xmlns="http://www.w3.org/1999/xhtml" xmlns:fb="http://www.facebook.com/2008/fbml">
is to tell Visual Studio the valid control names from Facebook such as <fb:login-button>. Here we also add a logout button so that user can log out the Facebook session. The Facebook JavaScript and FB initialization (FB.init) are included exactly as the regular html page we tested in previous section. A ListView control is used to display the friends’ image and name.
using System;
using System.Collections.Generic;
using System.Linq;
using System.Web;
using System.Web.UI;
using System.Web.UI.WebControls;
using System.Configuration;
using System.Xml.Linq;
using facebook;

namespace Web
{
public partial class FacebookTest : System.Web.UI.Page
{
string FacebookAPIKey = ConfigurationManager.AppSettings["facebook.APIKey"];
string FacebookSecret = ConfigurationManager.AppSettings["facebook.Secret"];

private string GetFacebookCookie(string cookieName)
{
string cookieValue = null;
string fullCookieName = FacebookAPIKey + "_" + cookieName;

if (HttpContext.Current.Request.Cookies[fullCookieName] != null)
{
cookieValue = HttpContext.Current.Request.Cookies[fullCookieName].Value;
}

return cookieValue;
}

protected void Page_Load(object sender, EventArgs e)
{
string sessionKey = GetFacebookCookie("session_key");
int userID = -1;
int.TryParse(GetFacebookCookie("user"), out userID);
bool isConnected = false;
if (int.TryParse(GetFacebookCookie("user"), out userID)
&& userID != -1 && !string.IsNullOrEmpty(sessionKey))
{
isConnected = true;
}
if (isConnected)
{
divLogin.Style["display"] = "none";
divLogout.Style["display"] = "block";

// Setup Facebook Toolkit API
API api = new API();
api.ApplicationKey = FacebookAPIKey;
api.Secret = FacebookSecret;
api.SessionKey = sessionKey;
api.uid = userID;

// Get User Info
facebook.Schema.user user = api.users.getInfo();
string userName = (user == null) ? string.Empty : user.name;

// Get User Friend List
IList<facebook.Schema.user> friends = api.friends.getUserObjects();
List<FBUserInfo> friendList = new List<FBUserInfo>();
foreach (facebook.Schema.user friend in friends)
{
FBUserInfo info = new FBUserInfo()
{
id = friend.uid.HasValue ? friend.uid.Value.ToString() : "",
name = friend.name,
imgURL = friend.pic
};
if (string.IsNullOrEmpty(info.imgURL))
info.imgURL = "http://static.ak.fbcdn.net/pics/q_silhouette.gif";
friendList.Add(info);
}
ListView1.DataSource = friendList;
ListView1.DataBind();

lblLoginStatus.Text = "You have logged in as " + userName;
lblFriendCount.Text = "You have " + friendList.Count.ToString() + " friends.";

}
else // Logged out
{
divLogin.Style["display"] = "block";
divLogout.Style["display"] = "none";
lblLoginStatus.Text = "You have not logged in Facebook.";
}
}

public class FBUserInfo
{
public string id { get; set; }
public string name { get; set; }
public string imgURL { get; set; }
}
}
}
The application first checks the login status by examining the cookie set by Facebook call-back via channel page (xd_receiver.htm). If the cookie is valid, a Facebook Developer Toolkit API object is created and its properties are populated by Facebook Connect setting and user’s login session stored in cookie. We then can use the API object to get user’s name and user’s friend list.

The user’s friends in Facebook will be listed on the page when the user successfully logs in Facebook Connect. Below is the screen-shot of the page:


Filter Friends by Social Network

The friend objects returned by Facebook Connect include a list of affiliations objects that identify the social networks. Filtering friends by affiliation group make the friend selection easier if the user has a large number of friends.

Following code snippet shows how to populate affiliation info in friend list using Facebook Developer toolkit:
// Get User Friend List
IList<facebook.Schema.user> friends = api.friends.getUserObjects();
Dictionary<long, string> affDictionary = new Dictionary<long, string>();
List<FBUserInfo> friendList = new List<FBUserInfo>();
foreach (facebook.Schema.user friend in friends)
{
FBUserInfo info = new FBUserInfo()
{
ID = friend.uid.HasValue ? friend.uid.Value.ToString() : "",
Name = friend.name,
ImageURL = friend.pic
};
if (string.IsNullOrEmpty(info.ImageURL))
info.ImageURL =
"http://static.ak.fbcdn.net/pics/q_silhouette.gif";

// Add social networks
IList<facebook.Schema.affiliation> affList = friend.affiliations.affiliation;
foreach (facebook.Schema.affiliation aff in affList)
{
if (!affDictionary.Keys.Contains(aff.nid))
affDictionary.Add(aff.nid, aff.name);
info.AffiliationIDs += aff.nid.ToString() + ",";
}
friendList.Add(info);
}

ListView1.DataSource = friendList;
ListView1.DataBind();

ddlAffiliation.Visible = friendList.Count > 0;
lblLoginStatus.Text = "You have logged in as " + userName;
lblFriendCount.Text = "You have total " + friendList.Count.ToString() + " friends.";

ddlAffiliation.DataSource = affDictionary;
ddlAffiliation.DataTextField = "Value";
ddlAffiliation.DataValueField = "Key";
ddlAffiliation.DataBind();
ddlAffiliation.Items.Insert(0, new ListItem("All", "0"));
The AffiliationIDs for each friend are stored in a hidden field so the client side JavaScript can set a friend’s visibility based on the selected affiliation ID:
<asp:ListView ID="ListView1" runat="server" EnableViewState="false">
<LayoutTemplate>
<ul class="friendlist">
<asp:PlaceHolder ID="itemPlaceholder" runat="server" />
</ul>
</LayoutTemplate>
<ItemTemplate>
<li>
<img src='<%#Eval("ImageURL") %>' width="75" height="75" />
<br/> <%#Eval("Name") %>
<input id="hidID" type="hidden" value='<%#Eval("ID") %>'/>
<input id="hidAffIDs" type="hidden" value='<%#Eval("AffiliationIDs") %>'/>
</li>
</ItemTemplate>
</asp:ListView>
jQuery and JavaScript and jQuery update the page when affiliation dropdown is changed. All filtering occurs in client side without any postback and AJAX call:
<script type="text/javascript">
$(document).ready(function() {
$("#<%= ddlAffiliation.ClientID %>").change(affiliationChanged);
});

function affiliationChanged() {
var affiliationID = $("#<%= ddlAffiliation.ClientID %> :selected").val();
var affiliationCount = 0;
$(".friendlist").find("li").each(function(i) {
var ids = $(this).find("#hidAffIDs").val();
$(this).show();
if (affiliationID != "0" && !hasIDInlist(ids, affiliationID))
$(this).hide();
else
affiliationCount++;
});
var affMsg = "There are " + affiliationCount + " friends in " +
$("#<%= ddlAffiliation.ClientID %> :selected").text() + " network.";
$("#<%=lblAffiliationFilter.ClientID %>").html(affMsg);
}

function hasIDInlist(ids, selectedID) {
if (ids) {
var idSplit = ids.split(',');
for (i = 0; i < idSplit.length; i++) {
if (idSplit[i] == selectedID) {
return true;
}
}
}
return false;
}
</script>
When user changes the social network filter, a JavaScript handler will check all friends’ affiliation IDs, and set the friend image invisible if the selected ID is not on the list. Below is screen-shot of the page with affiliation filter:


Sending Message to Selected Friends

For security reason Facebook Connect does not provider email address to other party, and there is no simple way to access user or user’s friends email addresses directly. The detail has been described in http://www.facebook.com/help.php?page=888. However a signed in user can send a Facebook notification to another user (by user’s ID) using Facebook Connect library. In Facebook Developer Toolkit, we can use API’s notifications.send method to send a notification to another user:
api.notifications.send(selectedFriend.id, "This is a message from Facebook Connect Test!");
The message will go to receiver’s Inbox Notification tab:

Some speical characters and html tags inside notification message will be filtered out by Facebook. The allowed tags for email notificaiton are listed in http://wiki.developers.facebook.com/index.php/Allowed_FBML_and_HTML_Tags#Notifications:_Allowed_Tags.

conclusion

With Facebook Connect, we can easily share the Facebook data and use them in our application.