Wednesday, July 03, 2013

WinJS Authentication

In windows store app there will be a login prompt when a network resource request requires authentication. As for HTML/JavaScript implementation, the login prompt only pops up once, and the authentication token is cached and used by subsequent requests. You can provide the user name and password in WinJS.xhr request to avoid the login popup:

    WinJS.xhr({user: "domain\\user", password: "mypassowrd", url: ...}).done(...);
This actually works fine with Basic, Digest and Integrated Windows Authentications, but be aware that such implementation is hard to maintain and not secure at all, and it's quite easy for end users to find out such secret, refer to this post.

In general we should not hard-code any credentials inside a mobile app. When authentication is required, building a custom login form will be more secure and result in better user experience. For some general services, such as user behavior tracking service, you may simply enable the anonymous access in your server.

In an Intranet environment when the client machine is inside a windows domain, the default windows credential can be used to auto-authenticate to the server if the "Enterprise Authentication" Capabilities option is enabled, but I haven't had a chance to test it yet. In most cases we don't need such setting because of the distribution nature of Windows 8 store app.

Microsoft also provides Windows.Security.Authentication.OnlineId API to authenticate the user with Microsoft accounts, a.k.a Windows Live Connects. How about the OAuth authentication? It's implemented inside WebAuthenticationBroker API. Microsoft has some code examples to show how to do OAuth with Facebook, Google, Twitter in WinJS. In my previous post I built a Twitter OAuth 1.0 proxy page using C#, which retrieves tweets directly using hard-coded OAuth keys and tokens. That's not the standard way of using OAuth. It's not trivial to do similar stuff in WinJS. Luckly some people has already done the work and put it at github with 400+ line of JavaScript code. Simply download and include the module and you are ready to go.

Monday, June 17, 2013

Proxy Page for New Twitter API 1.1

The old Twitter API V1.0 is just retired. The new API V1.1 requires OAuth authentication for each Twitter request. Our SharePoint Twitter WebPart is no longer working since this API update. I created a SharePoint layout page as a proxy connecting to Twitter using the new API so the Twitter services are available in our Intranet without the troublesome OAuth authentication. Also the proxy page caches the result locally for performance consideration and avoids exceeding the new Twitter request limit:

<%@ Page Language="C#"  %>

<%@ Import Namespace="System.Web.UI" %>
<%@ Import Namespace="System.Collections.Generic" %>
<%@ Import Namespace="System.Globalization" %>
<%@ Import Namespace="System.Security.Cryptography" %>
<%@ Import Namespace="System.Net.Security" %>
<%@ Import Namespace="System.Net" %>
<%@ Import Namespace="System.IO" %>
<%@ Import Namespace="System.Text" %>

<html xmlns="http://www.w3.org/1999/xhtml">
<head>
    <title>A proxy page for Twitter API V1.1</title>
    <meta name="ROBOTS" content="NOINDEX, NOFOLLOW">
    <meta http-equiv="Content-Type" content="text/html; charset=utf-8">
    <meta http-equiv="Content-language" content="en">

    <script runat="server">
            
        // oauth application keys
        string consumerKey = "xxxxxxxx";
        string consumerSecret = "xxxxxxxx";
        string accessToken = "xxxxxxxx";
        string accessTokenSecret = "xxxxxxxx";

        int cacheTime = 5; // Cache time in minutes
        string baseUrl = "https://api.twitter.com/1.1/";        
                
        void Page_Load(object sender, System.EventArgs e)
        {
            // handle parameters
            bool noCache = Request.QueryString["nocache"] == "true" ? true : false;
            string endpoint= string.IsNullOrEmpty(Request.QueryString["endpoint"]) ? "statuses/user_timeline.json" : Request.QueryString["endpoint"];
            string[] resStrings = new string[] { "endpoint", "nocache", "callback", "_" };
            List<string> reservedParameters = new List<string>(resStrings); 
            
            Dictionary<string, string> parameters = new Dictionary<string, string>();
            StringBuilder keys = new StringBuilder();
            foreach (String key in Request.QueryString.AllKeys)
            {
                if (!reservedParameters.Contains(key) && !parameters.ContainsKey(key)) 
                {
                    parameters.Add(key, Request.QueryString[key]);
                    keys.Append(key + "=" + Request.QueryString[key] + "|");
                }
            }
            string cacheKey = keys.ToString();
            if (string.IsNullOrEmpty(cacheKey)) // simply return if no parameter provided 
            {
                lblInfo.Text = "Invalid parameters";
                return;            
            }     
            
            string tweets = Convert.ToString(Cache[cacheKey]);
            if (noCache || string.IsNullOrEmpty(tweets)) // check if cache exsits
            {
                string requestUrl = baseUrl + endpoint;
                try
                {
                    tweets = GetTweets(requestUrl, parameters);
                    // Update cache
                    Cache.Insert(cacheKey.ToString(), tweets, null, DateTime.Now.AddMinutes(cacheTime), System.Web.Caching.Cache.NoSlidingExpiration);
                }
                catch (Exception ex)
                {
                    lblInfo.Text = "Error occur: " + ex.Message;
                    return;
                }
            }
            
            // prepare for writting data to Response
            Response.Clear();
            Response.ContentType = "application/json; charset=utf-8";
            Response.ContentEncoding = System.Text.Encoding.UTF8;
            if (!string.IsNullOrEmpty(Request.QueryString["callback"])) // wrap data for JSONP
                Response.Write(string.Format("{0}({1})", Request.QueryString["callback"], tweets));
            else
                Response.Write(tweets);
            Response.End();
        }

        // Reference: https://dev.twitter.com/discussions/15206
        string GetTweets(string url, Dictionary<string, string> parameters)
        {
            string responseString = string.Empty;
            StringBuilder queryStrings = new StringBuilder();

            // OAuth setting
            string oauthSignatureMethod = "HMAC-SHA1";
            string oauthVersion = "1.0";
            string oauthNonce = Convert.ToBase64String(new ASCIIEncoding().GetBytes(DateTime.Now.Ticks.ToString()));
            TimeSpan timeSpan = DateTime.UtcNow - new DateTime(1970, 1, 1, 0, 0, 0, 0, DateTimeKind.Utc);
            string oauthTimestamp = Convert.ToInt64(timeSpan.TotalSeconds).ToString();
            string compositeKey = Uri.EscapeDataString(consumerSecret) + "&" + Uri.EscapeDataString(accessTokenSecret);

            // OAauth signature: https://dev.twitter.com/docs/auth/creating-signature
            string oauthSignature;
            SortedList<string, string> authSigBaseValues = new SortedList<string, string>();
            authSigBaseValues.Add("oauth_consumer_key", consumerKey);
            authSigBaseValues.Add("oauth_nonce", oauthNonce);
            authSigBaseValues.Add("oauth_signature_method", oauthSignatureMethod);
            authSigBaseValues.Add("oauth_timestamp", oauthTimestamp);
            authSigBaseValues.Add("oauth_token", accessToken);
            authSigBaseValues.Add("oauth_version", oauthVersion);
            foreach (string key in parameters.Keys)
            {
                string escapedKey = Uri.EscapeDataString(key);
                string escapedValue = Uri.EscapeDataString(parameters[key]);
                authSigBaseValues.Add(escapedKey, escapedValue);
                queryStrings.Append("&" + escapedKey + "=" + escapedValue);
            }

            // build signagure base string
            StringBuilder oauthSigSB = new StringBuilder();
            foreach (KeyValuePair<string, string> item in authSigBaseValues)
            {
                oauthSigSB.Append("&" + item.Key + "=" + item.Value);
            }
            string signatureBaseString = "GET&" + Uri.EscapeDataString(url) + "&" + Uri.EscapeDataString(oauthSigSB.ToString().Remove(0, 1));

            // create OAuth signature 
            using (HMACSHA1 hasher = new HMACSHA1(ASCIIEncoding.ASCII.GetBytes(compositeKey)))
            {
                oauthSignature = Convert.ToBase64String(hasher.ComputeHash(ASCIIEncoding.ASCII.GetBytes(signatureBaseString)));
            }

            // create the request header
            string headerFormat = "OAuth oauth_nonce=\"{0}\", oauth_signature_method=\"{1}\", oauth_timestamp=\"{2}\", " +
                    "oauth_consumer_key=\"{3}\", oauth_token=\"{4}\", oauth_signature=\"{5}\", oauth_version=\"{6}\"";
            string authHeader = string.Format(headerFormat,
                                    Uri.EscapeDataString(oauthNonce),
                                    Uri.EscapeDataString(oauthSignatureMethod),
                                    Uri.EscapeDataString(oauthTimestamp),
                                    Uri.EscapeDataString(consumerKey),
                                    Uri.EscapeDataString(accessToken),
                                    Uri.EscapeDataString(oauthSignature),
                                    Uri.EscapeDataString(oauthVersion)
                            );
            if (queryStrings.Length > 0)
                url = url + "?" + queryStrings.ToString().Remove(0, 1);
            ServicePointManager.ServerCertificateValidationCallback = 
                new RemoteCertificateValidationCallback(delegate { return true; });
            ServicePointManager.Expect100Continue = false;

            // create request
            HttpWebRequest request = (HttpWebRequest)WebRequest.Create(url);
            request.Headers.Add("Authorization", authHeader);
            request.Method = "GET";
            request.ContentType = "application/x-www-form-urlencoded";

            try
            {
                WebResponse response = request.GetResponse();
                responseString = new StreamReader(response.GetResponseStream()).ReadToEnd();
            }
            catch (Exception ex)
            {
                throw  ex;
            }

            return responseString;
        }
    </script>

</head>
<body>
    <form id="form1" runat="server">
    <div>
        <p>
            <asp:Label ID="lblInfo" runat="server"></asp:Label>
        </p>
    </div>
    </form>
</body>
</html>

The proxy page can work as a regular ASP.NET page inside IIS. It can also run as a layout page in SharePoint: simply copy the file to the layouts folder under SharePoint 12/14 hive. and it will just work.

The proxy accepts different endpoint and parameter where the endpoint is the twitter service endpoint such as "statuses/user_timeline.json" or "search/tweets.json", and parameter is the query strings you pass to twitter such as "screen_name=mytwittername". The easiest way to consume the proxy Twitter servcie is using JavaScript which can be inserted into SharePoint OOB content editor WebPart:

<script type="text/javascript">
<!-- 
    $(document).ready(function() {
        // twitter proxy URL
        var url = 'http://twitterproxy/twitter.aspx?endpoint=statuses/user_timeline.json&screen_name=myname&count=10';
       // http://twitterproxy/twitter.aspx?endpoint=search/tweets.json&q=from:myname&result_type=recent
        $.ajax({url : url, cache: false, crossDomain: true, dataType: 'jsonp'}).done(function(data) {
            $('#tweeters').html("");
            $.each(data, function(i, tweet) {
                if(tweet.text) {
                    var date = parseDate(tweet.created_at);
                    var tweet_html = '<div><div class="tweetText">' + tweet.text + '</div>';
                    tweet_html += '<div class="tweetDate">'+ date.toString().substring(0, 24) +'</div></div>';
                    $('#tweeters').append(tweet_html);
                }
            });
        });
    });
    
    // Fix IE DateTime format issue
    function parseDate(str) {
        var v=str.split(' ');
        return new Date(Date.parse(v[1]+" "+v[2]+", "+v[5]+" "+v[3]+" UTC"));
    }
// -->  
</script>

Thursday, June 13, 2013

More on Cross-domain Authentication

In my previous post I mentioned that it's impossible to do NTLM or Kerberos authentication with client side JavaScript in cross-domain requests. We know username and password can be used in JavaScript Ajax calls for BASIC authentication, but not for NTLM or Kerberos. However my above statement is not fully true since on top of JavaScript the browser could do some magic for you. Thanks my colleague Antonio for correcting me on this. He has a test environment with Kerberos setup where a test user logged on domainA can visit a page from http://companyB.com in domainB, and inside that page JavaScript Ajax calls successfully grab data from http://companyA.com in domainA using JSONP and Kerberos authentication without user typing in username and password. What he did is simply add http://companyA.com to Local Intranet zone in IE, then IE will automatically logon http://companyA.com with Kerberos authentication seamlessly.

In this post I will explore some common scenarios related to browser or AJAX authentication, including Intranet and Internet environment. Note that for those public sites and services that allow anonymous access the cross-domain authentication issue doesn't exist at all.

1. The browser is in the same domain as the server (Windows Authentication).

If the user is in the same domain as the server where the cross-domain requests go to, such as above Kerberos case, the single-sign-on (SSO) would work with NTLM or Kerberos authentication, i.e. IE would auto-authenticate to the server with the current logged in Windows account. No user input is required in this case but the server has to be added to the Local Intranet zone. The key point is the the "Automatic logon only in intranet zone" setting in Local Intranet zone:

How about other browsers? Chrome shares the same network configuration with IE, so the IE settings will apply to Chrome and the auto-logon would just work fine in Chrome. In Firefox you need to open up the system configuration by typing "about:config" in the address bar, then double click the "network.automatic-ntlm-auth.trusted-uris" entry and set the domain names you want to auto-authenticate to, e.g. "google.com, microsoft.com" (not in "*.google.com" format which is used in IE trusted sites).

If the authentication failed, the browser will popup a login window to let you input your username and password.

2. The browser is not in the same domain as the server (Windows Authentication).

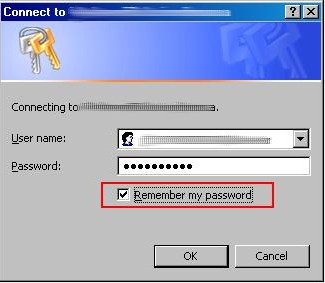
If the user is not in the same domain as the server where the cross-domain requests go to, e.g. a user logs into domainA and accesses a web page in which some JavaScript Ajax calls to http://companyB.com in domainB, then the single-sign-on won't work because domainA users can not be authenticated by domainB so a login window will pop up for user to input the username and password. In IE you have the option to save the password in this case:

After you select to save your password then next time IE will automatically authenticate for you (no need to input username and password again) on the same site if the "Automatic logon with current user name and password" is configured for the zone:

You can only save the password in IE but not in Chrome or Firefox. When the password is saved the Chrome will have the same behavior as IE, and you need to configure the same "network.automatic-ntlm-auth.trusted-uris" setting to let Firefox do the auto-authentication.

Where the password is saved by IE? They are stored in Windows secure storage. You can see and update those saved usernames and passwords by clicking "Control Panel => User Account => Advanced => Manage Password" or run "control keymgr.dll" command:

Just like the previous case you will also see a browser login window if the authentication failed.

3. Server is Form authentication.

In Form authentication you submit your username and password to the server. The server will issue an authentication cookie to the client if username and password are valid, then you are authenticated and logged on. The interactive steps are purely HTML and all browsers have the same behavior. After logging in the authentication cookie will be sent by browser in the consequent calls to the same server with same URI domain. The auto-authentication of AJAX calls will be okay if the cookie is valid which means that you have logged in to the server before the AJAX call. In some login forms you can select to "keep me logged in" option where a persistence cookie is generated for long time usage so you can auto-login next time even you close and reopen the browser.

Not like Windows authentication, browser will not popup a login window when authentication failed in AJAX calls, instead any error is silently swallowed by the browser by default. In Form authentication the server will respond to the client to redirect to the login page which is not recognized by AJAX call. Of course you can handle that specific 302 redirect case and popup a login window using JavaScript but that's another story.

4. How about OpenID, SAML, OAuth, Claimed based authentication, Federated authentication...?

In most cases the behavior is the same as Form authentication: access would be okay if you have signed in before the AJAX calls. This is valid as long as the server is using cookie to trace the authentication status, such as Windows and Form authentication discussed above, otherwise the authentication immediately fails. How to know if the server is using authentication cookie? You can check if you are able to access the site assets after successfully authenticated through the browser.

There're some cases where each service request requires authentication. The AJAX call will fail in such case unless you provide required data. One example is the new Twitter API V1.1: every Twitter API service call now requires OAuth authentication. Setting OAuth header using JavaScript directly is impractical and unsafe (however you could calculate the OAuth signature from the web server and JavaScript simply pass it to the Twitter service).

Also like Form authentication, you won't see any popup window whenever the authentication fails, and the AJAX calls are simply failed.

5. What about SSL, SSL client authentication?

SSL, also known as https protocol, encrypts the data in transport layer so the communication between the client and the server is protected. SSL itself doesn't do anything for Authentication. However server certificate is required to establish a SSL connection. The AJAX calls will fail if the server certificate is invalid such as a self-signed certificate. Browser will display a warning message if you visit the server with invalid certificate directly (not from AJAX call):

In order to get rid of the warning message, you could install the certificate and put it into Trusted Root Certification Authorities for IE and Chrome (caution of doing so) or import it to Firefox. After that you can visit the site without seeing the warning message page, and the AJAX calls now will be able to go through to the server for authentication.

SSL client authentication is another story. Basically SSL server also asks client's certificate when setting up the SSL connection. The SSL client authentication can be configured as optional or required. If client authentication is required the SSL connection will fail if browser doesn't provide a certificate, or the certificate is invalid, or the certificate is not accepted. If the SSL client authentication is okay, the SSL connection will be established and the regular server side authentication will come to play in the next step.

In summary, an indicator of a successful AJAX call is that you can browse the resource or service directly without any issue. The statement is okay for same-domain AJAX calls, but that's not enough in cross-domain scenarios where you can visit the site successfully in the browser but the cross-domain AJAX calls fail (such failure is not caused by client-server authentication). Cross-domain AJAX communication requires special implementation in both client side and server side, for example, you can define {crossDomain: true, dataType: 'jsonp'} parameters for jQuery AJAX calls in the client side, and implement JSONP or CORS in the server side. Following html page is created to test the cross-domain request using jQuery. Simply save the html page in your local machine, open the page and run the test:

<html xmlns="http://www.w3.org/1999/xhtml">
<head>
    <meta http-equiv="content-type" content="text/html; charset=utf-8" />          
    <title>Cross-domain AJAX test</title>          
    <script src="http://ajax.googleapis.com/ajax/libs/jquery/1.9.1/jquery.min.js" ></script>
</head>     
<body>         
    <div>
        <div style="text-align:center">
            <h3>Cross-domain AJAX test</h3>
            Server URL:  <input name="txtUrl" type="text" id="txtUrl" style="width:500px;" />
            <button id="btnTest">Send cross-domain request</button>
        </div>
        <div id="result"></div>
    </div>
    <script type="text/javascript">
        $(document).ready(function() {
            $("#btnTest").click(function () {
                testRequest($("#txtUrl").val());    
            });
        });
        
        function testRequest(url) {
            $("#result").html("");
            if (url) {
                $.ajax({url: url, cache: false, crossDomain: true, dataType: 'jsonp'})
                .done(function(data) {
                    var value = getDataString(data);//decodeURIComponent($.param(myObject));
                    $("#result").html("Response:<pre>" + value + "</pre>");})
                .fail(function(xhr, err) {
                    $("#result").html("Error occurs.");
                });    
            } else {
                $("#result").html("Invalid Url.");
            }
        }
        
        // http://www.sitepoint.com/javascript-json-serialization/
        function  getDataString(obj) { 
            var t = typeof (obj);
            if (t != "object" || obj === null) {
                // simple data type
                if (t == "string") 
                    obj = '"'+obj.replace(/>/g,'&gt;').replace(/</g,'&lt;')+'"';
                return String(obj);
            } else {
                // recurse array or object
                var n, v, json = [], arr = (obj && obj.constructor == Array);
                for (n in obj) {
                    v = obj[n]; t = typeof(v);
                    if (t == "string") 
                        v = '"'+v+'"';
                    else if (t == "object" && v !== null) 
                        v = getDataString(v);
                    json.push((arr ? "" : '"' + n + '":') + String(v));
                }
                return (arr ? "[" : "{") + String(json) + (arr ? "]" : "}");
            }
        };
    </script>
</body>
</html>

Thursday, June 06, 2013

Using FusionCharts in SharePoint

FusionCharts provide a separate product for SharePoint called Collabion Charts for SharePoint a SharePoint, where you can build charting pages easily in SharePoint by adding those charting WebParts. You have options to show FusionCharts in SharePoint if you have already purchased FusionCharts license and you don't want to pay extra for Collabion Charts. First you can use SharePoint as hosting environment, put all FusionCharts assets and the charting pages into a document library. Everything should just work fine. You can also add FusionCharts to a WebPart using out-of-box Content Editor WebPart (CEWP). First reference the FusionCharts JavaScript in one CEWP (edit HTML Source):
    <script src="/Documents/FusionCharts/FusionCharts.js" type="text/javascript"></script>
Then you can add chart in another CEWP:
    <div><div id="testChartContainer"></div></div>
    <script type="text/javascript">
    <!--  
        FusionCharts.setCurrentRenderer('javascript'); 
        var testChart = new FusionCharts( { id: "chart1", type: "Column2D", width: "400", height: "250"} );  
        testChart.setXMLUrl("/Documents/testChart.xml");      
        testChart.render("testChartContainer");
    // -->      
    </script>


Note: SharePoint 2010 could change the content you added to the CEWP via HTML Source editor. You need to make sure that the updated content and script are still valid.

Monday, June 03, 2013

A JavaScript Charting Solution - FusionCharts

Recently I have been working on FusionCharts to build dashboard pages. I think it's worthy writing some notes of my experience of using FusionCharts.

First of all, FusionCharts customer services are very good. I downloaded a trial version and did some testing. Then I have some issues and questions to ask. I always got their reply on the same day. FusionCharts is an India company. A few times I even received their replies in the afternoon which is midnight there (I am in UTC-5 zone). Overall they are helpful and respond quickly even although I am not their customer yet.

Secondly FusionCharts are purely client site implementation using Flash and JavaScript. All my discussion in this article is based on their JavaScript solution. That's different from some other data visualization tools I used before, such as Dundas, Infragistrics and DevExpress, all of which are .NET components, and they are considered as server side solution where you build your charts in ASP.NET code behind, and the charting images are generated in the server side.

The good part of client side approach is easy to develop and deploy. You simply create a HTML page, add desired FusionCharts objects, set their data source using JavaScript then you are done. The chart page can be put to anywhere that the user can access to such as in a web server, a shared drive or even local box, as long as the data source is also accessible to the user. In addition the client side JavaScript is considered as a cross-platform solution being able to run in different environment.

The drawbacks of client side approach include the potential performance issue, and the cross-domain data source restriction, as discussed below in detail.

Performance Issue

The charts are populated and rendered inside the browser. The performance could be an issue if you have many charts on a page. One simple dashboard test page with 10 charts consuming static content takes 3-5 seconds to render in latest Firefox and Chrome, and IE8/9 are even worst taking a least double time to render the page. Note that the tests are conducted locally so in reality the network round-trip would introduce some more delay. This may not be unacceptable in some cases. One suggestion from FusionCharts to improve the performance is wrap the charting JavaScript inside a setTimeout function and that would make the page a little bit more responsive during the page initial load:

    setTimeout(function () {
        var myChart= new FusionCharts( { id: "chart1", type: "Column2D", width: "400", height: "250"} );  
        myChart.setXMLUrl("chart1.xml");      
        myChart.render("chart1"); 
    }, 0);

Cross Domain Data Source Issue

FusionCharts support XML or JSON data source. The chart data can be embedded inside the page, static file or dynamically loaded from the server. There will be a cross-domain issue if the data source is not coming from the same domain as the original one hosting the page. For instance, if the chart page is from http://companyA.com, then all data from http://companyB.com will be rejected by the browser.

Recent version of Firefox and Chrome as well as IE10 support CORS standard to resolve the cross-domain issue. Basically the response from http://companyB.com includes some specific headers informing the browser to accept this cross-domain data. For above example the header "Access-Control-Allow-Origin: http://companyA.com" or "Access-Control-Allow-Origin: *" would work. Another generic solution for cross-domain requests is use JSONP. The client sends a request with a callback function name and the server wraps all the data as a parameter for that callback function.

Following code snippet demos how to implement CORS and JSONP in .NET:

using System;
using System.Collections.Generic;
using System.Linq;
using System.Web;
using System.Text;

namespace DataService
{
    /// <summary>
    /// Web handler to serve FusionCharts data using JSONP or CORS to resolve cross-domain issue 
    /// </summary>
    public class FusionChartService : IHttpHandler
    {

        public void ProcessRequest(HttpContext context)
        {
            string data = GetData(); // Populate chart data
            bool isJsonFormat = false; // Are data JSON format?
            
            context.Response.ContentEncoding = System.Text.Encoding.UTF8;
            context.Response.ContentType = "text/plain";

            if (string.IsNullOrEmpty(callback)) // Add CORS headers if NOT JSONP
            {
                context.Response.AppendHeader("Access-Control-Allow-Origin", "*");
                context.Response.AppendHeader("Access-Control-Allow-Headers", "Content-Type");
                string requestHeaders = context.Request.Headers["Access-Control-Request-Headers"];
                if (!String.IsNullOrEmpty(requestHeaders))
                    context.Response.AppendHeader("Access-Control-Allow-Headers", requestHeaders);
                context.Response.Write(data);
            }
            else // Wrap data inside the callback founction for JSONP
            {
                context.Response.Write(string.Format("{0}({1})", callback, isJsonFormat ? data : EscapeString(data)));
            }
        }

        private static string EscapeString(string s)
        {
            StringBuilder sb = new StringBuilder();
            sb.Append("\"");
            foreach (char c in s)
            {
                switch (c)
                {
                    case '\"':
                        sb.Append("\\\"");
                        break;
                    case '\\':
                        sb.Append("\\\\");
                        break;
                    case '\b':
                        sb.Append("\\b");
                        break;
                    case '\f':
                        sb.Append("\\f");
                        break;
                    case '\n':
                        sb.Append("\\n");
                        break;
                    case '\r':
                        sb.Append("\\r");
                        break;
                    case '\t':
                        sb.Append("\\t");
                        break;
                    default:
                        int i = (int)c;
                        if (i < 32 || i > 127)
                            sb.AppendFormat("\\u{0:X04}", i);
                        else
                            sb.Append(c);
                        break;
                }
            }
            sb.Append("\"");

            return sb.ToString();
        }

        public bool IsReusable
        {
            get
            {
                return false;
            }
        }
    }
}
An example of Ajax call consuming the JSONP service using jQuery (testing with version of 1.8.3):
    var params = { url: 'http://companyB.com/FusionChartService.ashx', cache: false, crossDomain: true, dataType: 'jsonp text'};
    $.ajax(params).done(function(data) {
        var myChart = new FusionCharts( { id: "chart1", type: "Column2D", width: "400", height: "250", debugMode : false } );  
        myChart.setXMLData(data);      
        myChart.render("chart1"); 
    }).fail(function(xhr, err) {
        console.log(err);
    }); 

Cross Domain Authentication Issue

Cross-domain authentication is the major challenge for client side JavaScript solution. Windows and Kerberos authentication simply don't work. There's not much you can do with JavaScript in terms of cross-domain authentication. You can either enable anonymous access or implement BASIC authentication in the server. In the latter case, the client needs to pass plain text username and password for each cross-domain Ajax call which is not safe and is not allowed in most organizations. One workaround is use proxy server to authenticate the service. But that's not a flexible solution as that's hard to implement and maintain, introducing extra layer of delay, and pushing back some logic to the server. So FusionCharts is not recommended if do have such cross-domain use case.

2013-06 Update: More on cross-domain authentication.

Friday, May 24, 2013

Adding Custom SOAP Header in .NET

An extra layer has been added to our back-end services (implemented by Java). Now all requests to those services require a set of custom SOAP headers. Existing client apps that consuming those services need to be updated for such change. A colleague asked me what's the best way to do the task in .NET and SoapExtension is my answer. SoapExtension has been available since .NET 1.1. There're many resources online about it and following code is my simple implementation:
using System;
using System.Collections.Generic;
using System.Linq;
using System.Text;

using System.IO;
using System.Web.Services.Protocols;

namespace SoapHeaderTest
{
    public class TestSoapExtension : SoapExtension
    {
        Stream oldStream;
        Stream newStream;

        public override Stream ChainStream(Stream stream)
        {
            oldStream = stream;
            newStream = new MemoryStream();
            return newStream;
        }

        public override object GetInitializer(LogicalMethodInfo methodInfo, SoapExtensionAttribute attribute)
        {
            return null;
        }

        public override object GetInitializer(Type WebServiceType)
        {
            return null;
        }

        public override void Initialize(object initializer)
        {
        }

        public override void ProcessMessage(SoapMessage message)
        {
            switch (message.Stage)
            {
                case SoapMessageStage.BeforeSerialize:
                    break;
                case SoapMessageStage.AfterSerialize:
                    AddSoapHeader(); // Add SOAP header before the request is sent
                    break;

                case SoapMessageStage.BeforeDeserialize:
                    Copy(oldStream, newStream); // No modification on response, simply copy over
                    newStream.Position = 0; // Rewind the stream
                    break;
                case SoapMessageStage.AfterDeserialize:
                    break;
                default:
                    throw new Exception("invalid stage");
            }
        }

        // Add custom SOAP header
        private void AddSoapHeader()
        {
            string headerTemplate =
                @"<soap:Header>
                    <h:myHeader xmlns:h=""http://company.com/webservice/soapheader/"">
                        <h:version>{0}</h:version>
                        <h:code>{1}</h:code>
                        <h:proxy>{2}</h:proxy>
                    </h:myHeader>
                </soap:Header>";
            //TODO: populate header values here
            string soapHeader = string.Format(headerTemplate, 1, 2, 3);

            // Get original SOAP message
            newStream.Position = 0;
            string soapMessage = (new StreamReader(newStream)).ReadToEnd();

            // Create a string with header data inserted to the original SOAP Xml before the <soap:Body> tag
            string newSoapMessage = soapMessage.Insert(soapMessage.IndexOf("<soap:Body"), soapHeader);

            // Write new SOAP message to the new stream
            newStream.Position = 0;
            TextWriter writer = new StreamWriter(newStream);
            writer.Write(newSoapMessage);
            writer.Flush();

            // Copy the content from the new stream to the old stream
            newStream.Position = 0;
            Copy(newStream, oldStream);
        }

        private void Copy(Stream from, Stream to)
        {
            TextReader reader = new StreamReader(from);
            TextWriter writer = new StreamWriter(to);
            writer.WriteLine(reader.ReadToEnd());
            writer.Flush();
        }
    }
}
To use the SoapExtension, simply register it in web.config for web applications, or app.config for Form, class libraries and console apps:
<?xml version="1.0" encoding="utf-8" ?>
<configuration>
    <system.web>
      <webServices>
        <soapExtensionTypes>
          <add type="SoapHeaderTest.TestSoapExtension, SoapHeaderTest" priority="1" group="Low"/>
        </soapExtensionTypes>
      </webServices>
    </system.web>
</configuration> 
After registration in web.config or app.config, all requests and responses will go through the custom SoapExtension pipe line.

Monday, May 06, 2013

WinJS MediaCapture Showing Previously Taken Photo Issue

In a Windows 8 store app we use video tag to show the live preview:

HTML:

<video id="cameraPreview"></video>
JavaScript:
    var mediaCapture = new Windows.Media.Capture.MediaCapture();
    mediaCapture.initializeAsync().done(function () {
        cameraPreview.src = URL.createObjectURL(mediaCapture, { oneTimeOnly: true });
        cameraPreview.play();
    }

After taking a photo, we usually store the image in a temporary location and display it on the screen so the user can review it and decide next step e.g. retake the photo or save to picture library.

An issue occurs when reopen the MeidaCaputre object next time: the previously taken photo will display for a few seconds before the new live preview video starts playing. Here reopen means a new MediaCapture object is created and initialized, then pass it to the Video element.

This is very confusing to the user. How come we always see the image taken previously? It sounds like there's some image caching mechanism in MediaCapture. But I tried all MediaCapture's properties and methods and none of them helps. Finally I figured out the trick is to set the poster property of the Video element and it would resolve the problem. The Video element caches the last taken photo as the default background before the streaming video starts playing. When the poster property is set, it will display that poster image instead.

Following JavaScript sets the poster a 1x1 black Data URI image, then a black background will show up instead of the previously taken image.

    var black1x1DataUri = "data:image/gif;base64,R0lGODlhAQABAIAAAAAAAAAAACH5BAAAAAAALAAAAAABAAEAAAICTAEAOw=="; 
    cameraPreview.poster = black1x1DataUri;

Thursday, May 02, 2013

Implementing Camera Switch, Resolution Change and Option Popup with MediaCapture API in WinJS

WinJS provides CameraCaptureUI and MediaCapture API to access camera. The CameraCaptureUI has predefined UI but if you want more control such as custom UI, MediaCapture is the only option.

David Rousset's posts, Tutorial Series: using WinJS & WinRT to build a fun HTML5 Camera Application for Windows 8 is great resource to learn how to work with MediaCapture API. But some common features available on CameraCaptureUI are not included in David's example. After some research and testing I implemented camera switching, resolution selection and camera option popup with MediaCapture API.

  • Change camera:
    An option to let user to switch another camera if multiple cameras available. The key is set the MediaCaptureInitializationSettings.videoDeviceId property, and pass MediaCaptureInitializationSettings to initialize the MediaCapture object. We can use Windows.Devices.Enumeration.DeviceInformation.finaAllAsync method to loop through all video capture devices and get all cameras' device ID.
  • Change resolution :
    User can change camera's resolution for photo taking. We use MediaCapture.videoDeviceController.getAvailableMediaStreamProperties method to get a list of available resolutions for the camera tied to the MediaCapture object, and use MediaCapture.videoDeviceController.setMediaStreamPropertiesAsync method to set the camera resultion.
  • Open other options dialog:
    A button to open camera's option dialog by calling Windows.Media.Capture.CameraOptionsUI.show(mediaCapture) method.

Following is code example implementing above three features. Although the code is targeting to photo functions for demo purpose, it applies to video capturing as well. Refer to David's posts for more details on how to work on videos using MediaCapture API.

<!DOCTYPE html>
<html>
<head>
    <meta charset="utf-8" />
    <title>CustomCameraPage</title>

    <!-- WinJS references -->
    <link href="//Microsoft.WinJS.1.0/css/ui-dark.css" rel="stylesheet" />
    <script src="//Microsoft.WinJS.1.0/js/base.js"></script>
    <script src="//Microsoft.WinJS.1.0/js/ui.js"></script>

    <!-- CustomCameraPage references -->
    <link href="/css/default.css" rel="stylesheet" />
    <script src="/js/default.js"></script>
</head>
<body>
    <div id="cameraPage">
        <video id="cameraPreview"></video>
        <img id="imgPhotoTaken" style="display:none;"/>
        <div class="footer">
            <button id="btnSave" title="Save a photo">Save Photo</button>
            <select id="selectResolutions" title="Camera Resolutions"></select>
            <span id="cameraOption" title="Set camera option">&#xe15e</span>
            <span id="cameraSwitch" title="Switch to another camera">&#xe124</span>
            <button id="btnTake" title="Take a photo">Take Photo</button>
        </div>
    </div>
</body>
</html>
CSS:
#cameraPreview, #imgPhotoTaken { width: 100%; height: 100%; }
#cameraPage .footer { position: absolute; bottom: 0px; left: calc(50% - 200px); }
#cameraPage .footer > * { background-color: rgba(0,0,0,0.5); color: #ffffff; margin-left: 10px; }
#cameraPage .footer  { font-size: 1.4em; }
JavaScript:
// For an introduction to the Blank template, see the following documentation:
// http://go.microsoft.com/fwlink/?LinkId=232509
(function () {
    "use strict";

    WinJS.Binding.optimizeBindingReferences = true;

    var app = WinJS.Application;
    var activation = Windows.ApplicationModel.Activation;

    var mediaCapture;
    var cameraSettings;
    var allCameras = [];
    var cameraResolutions = [];
    var liveMode = true;
    var mediaType = Windows.Media.Capture.MediaStreamType;
    var tempFile = "photo.jpg";
    var tempFolder = Windows.Storage.ApplicationData.current.localFolder;
    var fileSaver = new Windows.Storage.Pickers.FileSavePicker();

    app.onactivated = function (args) {
        if (args.detail.kind === activation.ActivationKind.launch) {
            if (args.detail.previousExecutionState !== activation.ApplicationExecutionState.terminated) {
                // TODO: This application has been newly launched. Initialize
                // your application here.
            } else {
                // TODO: This application has been reactivated from suspension.
                // Restore application state here.
            }
            args.setPromise(WinJS.UI.processAll());

            initPage();
        }
    };

    app.start();

    // Page initialization
    function initPage() {
        fileSaver.suggestedStartLocation = Windows.Storage.Pickers.PickerLocationId.picturesLibrary;
        fileSaver.fileTypeChoices.insert("JPG image", [".jpg"]);
        getCamera().then(function (camera) {
            if (camera) {
                wireControls();
                if (allCameras.length <= 1) {
                    cameraSwitch.disabled = "disabled";
                }
                startCamera(camera);
            } else {
                showError("No camera found.", "Error");
            }
        },
        function (error) {
            onCameraError(error);
        });
    }

    // UI element event binding 
    function wireControls() {
        btnSave.addEventListener("click", saveImage);
        btnTake.addEventListener("click", takePhoto);
        cameraSwitch.addEventListener("click", switchCamera);
        cameraOption.addEventListener("click", setCameraOtherOption);
        selectResolutions.addEventListener("change", setCameraResolution);
    }

    // Creating a new mediaCapture object based on a selected camera, then get all its available resolutions;
    // Return a Promise when completed
    function startCamera(camera) {
        if (camera) {
            cameraSettings = new Windows.Media.Capture.MediaCaptureInitializationSettings();
            cameraSettings.photoCaptureSource = Windows.Media.Capture.PhotoCaptureSource.videoPreview;
            cameraSettings.streamingCaptureMode = Windows.Media.Capture.StreamingCaptureMode.video;
            cameraSettings.videoDeviceId = camera.id;
            mediaCapture = new Windows.Media.Capture.MediaCapture();
            mediaCapture.addEventListener("failed", onCameraError, false);
            return mediaCapture.initializeAsync(cameraSettings).then(function () {
                mediaCapture.setPreviewRotation(Windows.Media.Capture.VideoRotation.none);
                return getCameraResolutions();
            }).then(function () {
                cameraPreview.src = URL.createObjectURL(mediaCapture, { oneTimeOnly: true });
                cameraPreview.play();
            },
            function (error) {
                showError(error);
            });;
        } else {
            return WinJS.Promise.wrapError("No camera to start");
        }
    }

    // Release resource of live video preview and mediaCapture object
    function releaseCamera() {
        cameraView.src = null;
        mediaCapture = null;
    }

    // Loop through all cameras
    // Return a Promise with a default camera
    function getCamera() {
        allCameras = [];
        return new WinJS.Promise(function (c, e) {
            var deviceInfo = Windows.Devices.Enumeration.DeviceInformation;
            return deviceInfo.findAllAsync(Windows.Devices.Enumeration.DeviceClass.videoCapture).then(function (devices) {
                if (devices.length > 0) { // Camera found
                    var defaultCamera = devices[0]
                    for (var i = 0; i < devices.length; i++) {
                        var device = devices[i];
                        allCameras.push(device);
                        // Default to embedded front camera
                        if (device.enclosureLocation && device.enclosureLocation.panel == Windows.Devices.Enumeration.Panel.front)
                            defaultCamera = device;
                    }
                    c(defaultCamera);
                } else { // No camera found
                    c();
                }
            },
            function (error) { // Error
                e(error);
            });
        });
    }

    // Switch to different camera if mulitple cameras available
    function switchCamera() {
        if (mediaCapture && allCameras && allCameras.length > 1) {
            var currentCameraId = mediaCapture.mediaCaptureSettings.videoDeviceId;
            var nextCamera = null;
            var cameraCount = allCameras.length;
            for (var i = 0; i < cameraCount; i++) {
                var cam = allCameras[i];
                if (cam.id === currentCameraId) {
                    if (i == (cameraCount - 1)) {
                        nextCamera = allCameras[0];
                    } else {
                        nextCamera = allCameras[i + 1];
                    }
                    break;
                }
            }
            if (nextCamera) {
                releaseCamera();
                startCamera(nextCamera);
            }
        }
    }

    // Take a photo, save it to temporary folder then display it on the screen
    // Return a Prmoise when completed
    function takePhoto() {
        if (mediaCapture) {
            if (!liveMode) { // Show the live video preview if clicking "Retake"
                toggleView();
                return WinJS.Promise.as();
            } else { // Save and display taken photo if clicking "Take"
                var saveOption = Windows.Storage.CreationCollisionOption;
                return tempFolder.createFileAsync(tempFile, saveOption.replaceExisting).then(function (file) {
                    var photoProperties = Windows.Media.MediaProperties.ImageEncodingProperties.createJpeg();
                    return mediaCapture.capturePhotoToStorageFileAsync(photoProperties, file).then(function (result) {
                        return tempFolder.getFileAsync(tempFile).then(function (newFile) {
                            if (newFile) {
                                var imageUrl = URL.createObjectURL(file, { oneTimeOnly: true });
                                imgPhotoTaken.src = imageUrl;
                                toggleView();
                            }   
                        });
                        
                    });
                });
            }
        }
    }

    // Toggle display to show taken photo or video live preview, and switch button text to "Take" or "Retake"
    function toggleView () {
        if (liveMode) { // when showing live video preview
            liveMode = false;
            btnTake.textContent = "Retake";
            imgPhotoTaken.style.display = "block";
            cameraPreview.style.display = "none";
            cameraPreview.pause();
            
        } else { // when showing taken image 
            liveMode = true;
            btnTake.textContent = "Take";
            cameraPreview.style.display = "block";
            imgPhotoTaken.style.display = "none";
            cameraPreview.play();
        }
    }

    // Get all resolutions of current MediaCapture object and populate resolutions option in UI 
    // Return a Promise when completed
    function getCameraResolutions() {
        if (mediaCapture) {
            cameraResolutions = [];
            while (selectResolutions.length > 0) {
                selectResolutions.remove(0);
            }

            var currentResolution = mediaCapture.videoDeviceController.getMediaStreamProperties(mediaType.videoPreview);
            var allResolutions = mediaCapture.videoDeviceController.getAvailableMediaStreamProperties(mediaType.videoPreview);

            // Save all unique resolutions
            var tempResolutions = [];
            for (var i = 0; i < allResolutions.length; i++) {
                var res = allResolutions[i];
                if (res.width < 600)
                    continue;
                var hasDuplicated = false;
                tempResolutions.forEach(function (item) {
                    if (item.width == res.width && item.height == res.height)
                        hasDuplicated = true;
                });
                if (!hasDuplicated)
                    tempResolutions.push(res);
            }

            // Sort all unique resolutions from low to high based on width
            tempResolutions.sort(function (item1, item2) {
                return item1.width == item2.width ? item1.height - item2.height : item1.width - item2.width;
            });

            // Save camera resolutions and populate resolution options in UI 
            for (var i = 0; i < tempResolutions.length; i++) {
                var res = tempResolutions[i];
                cameraResolutions.push(res);
                selectResolutions.add(new Option(res.width + "x" + res.height));
                if (currentResolution.width == res.width && currentResolution.height == res.height) {
                    selectResolutions.selectedIndex = i;
                }
            }
            return mediaCapture.videoDeviceController.setMediaStreamPropertiesAsync(mediaType.videoPreview, currentResolution);
        } else {
            return WinJS.Promise.as();
        }
    }

    // Switch to a different resolution on a camera
    function setCameraResolution() {
        if (mediaCapture) {
            try {
                var index = selectResolutions.selectedIndex;
                if (cameraResolutions.length > index) {
                    var resolution = cameraResolutions[index];
                    mediaCapture.videoDeviceController.setMediaStreamPropertiesAsync(mediaType.videoPreview, resolution).then(function () {
                        cameraPreview.src = null;
                        cameraPreview.src = URL.createObjectURL(mediaCapture, { oneTimeOnly: true });
                        cameraPreview.play();
                    },
                    function (error) {
                        onCameraError(error);
                    });
                }
            } catch (e) {
                showError(e);
            }
        }
    }

    // Popup camera option menu
    function setCameraOtherOption() {
        if (mediaCapture) {
            Windows.Media.Capture.CameraOptionsUI.show(mediaCapture);
        }
    }

    // When user select to save a photo 
    function saveImage() {
        if (liveMode) {
            takePhoto().then(function () {
                saveImageToStorage();
            });
        } else {
            saveImageToStorage();
        }         
    }

    // Open file picker and save photo to specific name and location
    function saveImageToStorage() {
        fileSaver.pickSaveFileAsync().then(function (file) {
            if (file) {
                tempFolder.getFileAsync(tempFile).then(function (tmpImage) {
                    tmpImage.copyAndReplaceAsync(file).done(function () {
                        console.log("Photo saved to " + file.path + " successfully.");
                    });
                });
            }
        });
    }

    // Error occurs during camera operation
    function onCameraError(error) {
        showError(error);
    }

    // Ddisplay error information
    function showError(error, title) {
        var message = (error && error.message) ? error.message : error;
        var msgPopup = new Windows.UI.Popups.MessageDialog(message);
        if (title)
            msgPopup.title = title;
        msgPopup.commands.append(new Windows.UI.Popups.UICommand("Ok"));
        msgPopup.showAsync();
    }
})();

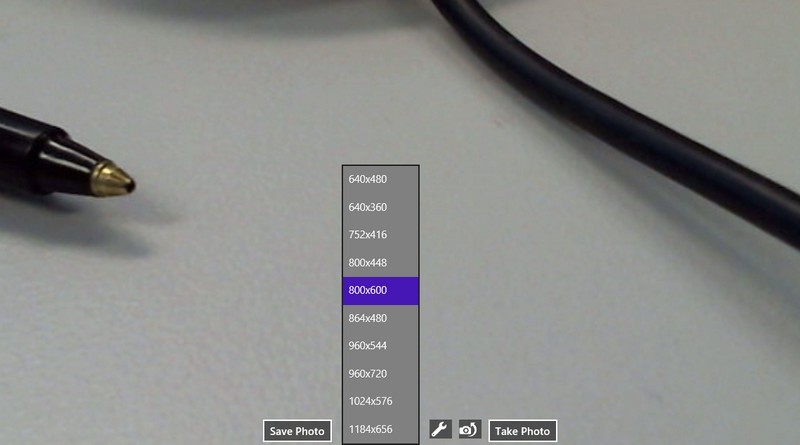
The resolution option now is available for user to select:

When camera other options dialog pops up:

When a photo is taken, you have option to retake or save it:

Wednesday, April 24, 2013

Windows 8 Orientation Check

Ideally we would like to restrict rotation for some specific pages in a Windows 8 mobile app. For example, always show landscape mode for one page and portrait mode for another page. This is super simple in Android where we can configure an activity's screen orientation in AndroidManifest.xml file or set it through code. After some research, unfortunately I found it's impossible doing such simple thing in Windows 8.

As a workaround we display a warning message on the screen when the orentation is not in desired mode. First I tried OrientationSensor :

    var orientationSensor = Windows.Devices.Sensors.SimpleOrientationSensor.getDefault();
    if (orientationSensor) 
        orientationSensor.addEventListener("orientationchanged", onCameraOrientationChanged);
The event is set in a few pages not globally, but I found the event is not reliable and it's not fired sometimes when the screen is rotated. So I go back to the "resize" event and it always works:
    window.addEventListener("resize", orientationCheck);
    function orientationCheck() {
        var isOnCertainPage = 0; // Check if it's current page
        if (isOnCertainPage) { 
            if (Windows.UI.ViewManagement.ApplicationView.value != 
               Windows.UI.ViewManagement.ApplicationViewState.fullScreenLandscape) {
                // Show warning message 
            }
        }
    }

Friday, April 12, 2013

Using HTML5 Canvas to Manipulate Image in Windows 8

I presented a way to upload multiple images in my previous post. Sometime we need to manipulate the images first, such as resizing, compress, then do the upload. There's a few ways to do such job using Windows 8 JavaScript. The easiest one is use HTML5 canvas:

    // Convert image dataUri format to blob format
    function dataURItoBlob(dataURI) {
        var byteString = atob(dataURI.split(',')[1]);
        var mimeString = dataURI.split(',')[0].split(':')[1].split(';')[0]

        var byteArray = new Uint8Array(byteString.length);
        for (var i = 0; i < byteString.length; i++) {
            byteArray[i] = byteString.charCodeAt(i) & 0xff;
        }

        return new Blob([byteArray], { type: mimeString });
    }

    // Use HTML5 canvas to resize and compress an image
    function resizeAndCompressImageToBlob(image, length, quality) {
        var isLandScape = image.naturalWidth > image.naturalHeight;
        var width = isLandScape ? length :  parseInt((length / image.naturalHeight) * image.naturalWidth)
        var heigh = isLandScape ? parseInt((width / image.naturalWidth) * image.naturalHeight) : length;
        var cvs = document.createElement('canvas');
        cvs.width = width;
        cvs.height = heigh;
        cvs.getContext("2d").drawImage(image, 0, 0, width, heigh);
        var dataUri = cvs.toDataURL("image/jpeg", quality);
        var imgBlob = dataURItoBlob(dataUri);
        return imgBlob;
    }

    // Load image asynchronously
    function loadImageAsync(src) {
        return new WinJS.Promise(function (c, e, p) {
            var img = new Image();
            img.src = src;
            img.addEventListener("load", function () {
                c(img);
            });
        });
    }

    function uploadMultipleImages(url, formFields) {
        return new WinJS.Promise(function (c, e, p) {
            var dataToSend = new FormData();
            var filePicker = new Windows.Storage.Pickers.FileOpenPicker();
            filePicker.fileTypeFilter.replaceAll([".jpg", ".jpeg"]);
            filePicker.suggestedStartLocation = Windows.Storage.Pickers.PickerLocationId.picturesLibrary;

            filePicker.pickMultipleFilesAsync().then(function (files) {
                if (files.length === 0) {
                    console.log("No file selected");
                    return;
                }
                if (formFields && formFields.length > 0) {
                    formFields.forEach(function (formField) {
                        for (var key in formField) {
                            dataToSend.append(key, formField[key]); // Add field value
                        }
                    });
                }
                var imgPromises = []; // Promises for all image loading
                files.forEach(function (file, index) {
                    var objectUrl = URL.createObjectURL(file, { oneTimeOnly: true });
                    var loadImage = loadImageAsync(objectUrl, file.name);
                    imgPromises.push(loadImage);
                });

                // Wait for all async calls completion 
                WinJS.Promise.join(imgPromises).then(function (data) { 
                    var savePromieses = [];
                    for (var i = 0; i < data.length; i++) {
                        var imageBlob = resizeAndCompressImageToBlob(data[i], 1200, 0.8);
                        dataToSend.append(files[i].name, imageBlob, files[i].name);
                    }

                    var options = { url: url, type: "POST", data: dataToSend };
                    WinJS.xhr(options).then(function (response) {
                        c(response);
                    },
                    function (xhrError) {
                        e(xhrError);
                    });

                },
                function (joinError) {
                    e(joinError);
                });
            });
        });
    }