Monday, March 19, 2012

Setup Windows 8 Dev Virtual Machine

Windows 8 Customer Preview Edition has been released for about two weeks. Finally I got a chance to install a Windows 8 dev virtual machine using free VMWare Player in a Samsung 900X laptop (BTW Samsung touchpad really sucks). The setup is quick and straightforward:

1. Download required software (all free):
Windows 8 CP ISO (64-bit English version) http://windows.microsoft.com/en-us/windows-8/iso
Windows 8 CP Product Key: DNJXJ-7XBW8-2378T-X22TX-BKG7J
Visual Studio 2011 Ultimate Beta ISO http://www.microsoft.com/visualstudio/11/en-us/downloads#ultimate
VMWare Player http://downloads.vmware.com/d/info/desktop_end_user_computing/vmware_player/4_0

I also tried the Oracle Virtual Box. Everything is okay (latest Virtual Box even has the Windows 8 OS in the option list), except the screen resolution setting is not desired. VMWare Player 4.0.2 recognized the video card properly and I simply turned the screen size to 1366x768 without any tweaking.

2. Install VMWare player and then reboot the laptop as prompted.

3. Open VMWare player, from File menu click Create a New Virtual Machine…In New Virtual Machine Wizard select I will install the operating system later option.


4. Select Windows 7 x64 as Guest Operating System.


5. Select a meaningful name for the VM and its installation location.


6. Choose a VM disk size (default 60G) and select Store virtual disk as a single file.


7. Click Customize Hardware button to configure more memory such as 4G and more CPU resources such as 2 CPUs; in CD/DVD option make sure to use downloaded Windows 8 ISO file. Leave other option unchanged and click finish (you can disconnect printer, sound card here).


8. Highlight the newly added VM in VMWare player window, and click Play virtual machine to start the VM instance.


9. The virtual machine will start to install the Windows 8 from the DVD mounted in step 7. You will see a dummy fish all around during the installation. Anybody could tell the story about that dummy fish?


10. Follow the Windows 8 setup wizard to complete the installation. It took less than 10 minutes to finish in a laptop (Intel i5 with 8G memory). One tip is to select "Don't want to sign in with a Windows account" and setup a local account to sign in the new system, which is preferable for a dev VM. Below is the Windows 8 Metro-style welcome screen:


11. Mount and Install Visual Studio 11 Beat. In the Virtual Machine Setting, under CD/DVD option, select "Use ISO image file" and pick the downloaded Visual Studio 11 Beta ISO file. Click Okay then you will be able to see the Visual Studio Installer from the DVD drive (desktop mode) inside the VM. Just click the installer and all the rest is the same as VS2010 setup.


I got the error message of "You need a developer license to develop this style of app for Windows 8 Consumer preview..." when first ran the Visual Studio 11 Beta in the VM. The laptop was not connected to Internet during the Visual Studio setup and maybe that caused the issue. Simply signing in with a Microsoft account on the popup window you would be able to get a developer license (valid for one month). The developer license is free and it's per-machine basis.

Next step is play around the Metro UI and the new Windows RT...

Thursday, March 08, 2012

A Lesson Learned From A SharePoint Patch Installation

A busy morning started from tons of reported issues on our SharePoint 2010 portal: my sites, audience, and some navigations were not working...Open up SharePoint Central Admin we first noticed saw an error "User Profile Application's connection is currently not available.." in the user profile service:


Inside profile synchronization service we saw the "An error has occurred while accessing the SQL Server database or the SharePoint Server Search service. If this is the first time you have seen this message, try again later. If this problem persists, contact your administrator.":


It looked like something wrong with the database connection. But there's no recent change on SQL database and service accounts. From the SharePoint log we noticed many unexpected errors from User Profile Web Services:

w3wp.exe (0x0B3C) 0x0268 SharePoint Portal Server User Profiles eh0u Unexpected ProfilePropertyService.GetProfileProperties Exception:
System.MissingMethodException: Method not found: 'Microsoft.SharePoint.Administration.SPIdentifierType Microsoft.SharePoint.Administration.SPAce`1.get_BinaryIdType()'. at
Microsoft.Office.Server.Administration.SPAclFormatter.Serialize[TRights](XmlWriter xmlWriter, SPAcl`1 acl) at
Microsoft.Office.Server.Administration.SPAclFormatter.Serialize[TRights](SPAcl`1 acl) at
Microsoft.Office.Server.Administration.UserProfileApplication.get_SerializedAdministratorAcl() at
Microsoft.Office.Server.Administration.UserProfileApplication.GetProperties() at
Microsoft.Office.Server.UserProfiles.ProfilePropertyService.GetProfileProperties() 4507cc64-e9bd-43d3-9191-5e10b9509083

"Method not found" implies that the service calls and web services were not matching and they had different method signature. What on earth was happening? We recalled that a SharePoint security patch KB2597124 was installed last night (described in Microsoft Security Bulletin). Would it be the culprit? Not likely at the first glance since we a few developers had already installed that patch and didn't find any issue on it.

We traced down the SharePoint update history and found the security patch was installed successfully. The only difference between development and production machines is that production servers didn't have SharePoint Oct. 2011 cumulative updates installed but development machines did:
Production environment: SharePoint2010_SP1(14.0.4763.1000) + KB_2597124_Patch
Dev environment: SharePoint2010_SP1(14.0.4763.1000) + Oct_2011_CU(14.0.6112.5000) + KB_2597124_Patch

Would that difference caused the problem? We read through the patch instruction and it clearly showed it can be applied to SharePoint 2010 or SharePoint 2010 SP1 server without any other prerequisite information.

Anyway we did some tests. We installed KB2597124 Patch in a SharePoint 2010 SP1 test machine (14.0.4763.1000 without any CU installed). Bamm, we then saw all those issues in the test machine!

The conclusion was clear. That the security patch has dependency on previous cumulative updates (Oct. 2011 CU or latest Dec. 2011 CU). But this dependency information is not included in patch’s document, and security patch doesn’t do any prerequisite check.

Those "Method not found" errors now are understandable. Those CU updates modify some user profile web services, and the security patch makes some changes on top of those updated web services. I guess Microsoft found the security vulnerability. They thought it's critical so they teamed up some developers to work on it quickly. What those developers did was grab the latest code including the CU build, fix the issue, test it and make it public. But should Microsoft be a little bit more responsible for that? At least do some testing for different environments before the release right?

The security patch can not be uninstalled. The only option for us was to apply the CU after the security patch which is not the right order. We installed Oct. 2011 CU in that test machine with security patch installed. The CU install was smooth but it failed in SharePoint configuration wizard after machine reboot as prompted:

A few errors can be found in the log file:

03/08/2012 16:08:49 14 ERR The exclusive inplace upgrader timer job failed.
03/08/2012 16:08:49 14 ERR Task upgrade has failed with a PostSetupConfigurationTaskException An exception of type Microsoft.SharePoint.PostSetupConfiguration.PostSetupConfigurationTaskException was thrown. Additional exception information: Failed to upgrade SharePoint Products.
03/08/2012 16:08:49 14 ERR An exception of type Microsoft.SharePoint.PostSetupConfiguration.PostSetupConfigurationTaskException was thrown. Additional exception information: Failed to upgrade SharePoint Products.
Microsoft.SharePoint.PostSetupConfiguration.PostSetupConfigurationTaskException: Exception of type 'Microsoft.SharePoint.PostSetupConfiguration.PostSetupConfigurationTaskException' was thrown.
at Microsoft.SharePoint.PostSetupConfiguration.UpgradeTask.Run()
at Microsoft.SharePoint.PostSetupConfiguration.TaskThread.ExecuteTask()
03/08/2012 16:08:49 14 ERR Task upgrade has failed
03/08/2012 16:08:49 1 ERR Task upgrade has stopped and failed. Total failed is now 1
03/08/2012 16:08:49 8 ERR Task upgrade SharePoint Products failed, so stopping execution of the engine
03/08/2012 16:08:49 8 ERR Failed to upgrade SharePoint Products.
An exception of type Microsoft.SharePoint.PostSetupConfiguration.PostSetupConfigurationTaskException was thrown. Additional exception information: Failed to upgrade SharePoint Products.
Microsoft.SharePoint.PostSetupConfiguration.PostSetupConfigurationTaskException: Exception of type 'Microsoft.SharePoint.PostSetupConfiguration.PostSetupConfigurationTaskException' was thrown.
at Microsoft.SharePoint.PostSetupConfiguration.UpgradeTask.Run()
at Microsoft.SharePoint.PostSetupConfiguration.TaskThread.ExecuteTask()
03/08/2012 16:08:49 8 ERR One or more configuration tasks has failed or some tasks were not run
03/08/2012 16:08:49 8 ERR Configuration of SharePoint Products failed. Configuration must be performed in order for this product to operate properly. To diagnose the problem, review the extended error information located at C:\Program Files\Common Files\Microsoft Shared\Web Server Extensions\14\LOGS\PSCDiagnostics_3_8_2012_15_42_40_120_1586599544.log, fix the problem, and run this configuration wizard again.

We could see there were a few configuration tasks errors during the configuration wizard, which may because "Configuration must be performed in order for this product to operate properly" (message from log error). Fortunately, we found the site was back to normal after the CU installation: user profile service was up, mysites and navigation were all working properly. Reapplying the security patch was not implemented and we just didn't have enough time to test all that.

Lesson learned: make sure the test machine has the exact same configuration, fully test before applying any SharePoint patch, and don't take Microsoft for granted.

Monday, February 27, 2012

Working With Windows Phone 7

After Windows Phone 7.1 SDK was installed, a list of Silverlight-based WP project templates will be available in Visual Studio 2010. Then you are ready to create your WP application using Sliverlight(XAML/C#). Yes WP just looks like a special Sliverlight client. You can simply test your WP application simply by the built-in emulator.

I got a Samsung Focus WP handset. I created a simple app and hoped easily to deploy it to the handset device. I thought it's trivial since I found "Windows Phone Device" option right beside the debug button on VS2010 menu. But it's not as easy as I thought.

I connected the handset to the dev machine with a USB cable, then click run with "Windows Phone Device" option. Bingo I got an error telling me that Zune software is not installed. Why deploying a WP app has business with the notorious Zune? Just copying the bad ideal of tethering iPhone on iTune from Apple? Is iZune or iTone a better name for that? No idea what MS is thinking about. Anyway download a 100M Zune package, install it in the dev machine and reboot the machine.

Ready to deploy my own app to the external handset right? The answer is NO! I got another error "Failed to connect to device as it is developer locked". Fantastic the Samsung phone is "locked". Is it locked by MS, Samsung or the carrier? I don't know. But it doesn't look like a carrier lock as iPhone's case.

To unlock a smartphone device, you will have to register a App Hub account, basically a WP/XBOX developer membership costing $99 a year. By paying a hundred bucks, you are eligible to unlock three physical smartphone devices the most. Who figured out the number of 3, instead of 5, 10 or whatever? Guess people from WP team are quite sure that there won't be more than three WP devices around you as a developer. It’s just ridiculous.

So you have a smartphone device, and you want to do some homebrew stuff for yourself and don't want to pay $99/year fee, what should you do? No luck at all! You may end up to an Android device.

WP market share is less than 5 percent, almost ignorable. It's so low that developers are just not willing to work on it. Should MS just make WP development a bit easier in such case? Sigh...

Friday, February 17, 2012

Replacing SharePoint 2010 Content Editor WebPart Links

This console app is to replace those hard-coded URLs inside content editor web parts. In previous post we showed how to extend https://proudctionServer application to https://stagingServer, but some URLs inside the content editor web parts in https://stagingServer are still pointing to https://productionServer. This console will replace them as desired staging URLs.

using System;
using System.Collections.Generic;
using System.Linq;
using System.Text;
using System.Xml;
using System.Web.UI.WebControls.WebParts;
using Microsoft.SharePoint;
using Microsoft.SharePoint.WebPartPages;
using Microsoft.SharePoint.Administration;

namespace ContentEditorWPLinkUpdate
{
/// <summary>
/// This console application is to replace hard-coded links inside ContentEditorWebPart.
/// e.g.
/// <a href="https://productionServer/news/abcd">abcd news</a>
/// will be replaced by:
/// <a href="/news/abcd">abcd news</a>
/// Run the executable directly or run it with optional parameters:
/// Cmd:\>ContentEditorWPLinkUpdate [originalLink] [newLink]
/// </summary>
class Program
{
readonly static string webApplication = "https://productionServer/";
static string oldUrl = "https://productionServer/";
static string newUrl = "/";
static string hrefLinkTeReplaced = string.Format("href=\"{0}", oldUrl);
static string srcLinkToBeReplaced = string.Format("src=\"{0}", oldUrl);

static void Main(string[] args)
{
if (args.Length > 0)
{
oldUrl = args[0].Trim().TrimEnd(new char[] { '/' }) + "/";
hrefLinkTeReplaced = string.Format("href=\"{0}", oldUrl);
srcLinkToBeReplaced = string.Format("src=\"{0}", oldUrl);
if (args.Length > 1)
newUrl = args[1].Trim().TrimEnd(new char[] { '/' }) + "/";
}

Console.WriteLine("Replacing URL {0} by {1} for content editor WebParts...", oldUrl, newUrl);

SPWebApplication webApp = SPWebApplication.Lookup(new Uri(webApplication));

foreach (SPSite siteCollection in webApp.Sites)
{
Console.WriteLine("Updating Site collection: " + siteCollection.Url);

foreach (SPWeb web in siteCollection.AllWebs)
{
UpdateWebRootFolderFiles(web);
UpdatePagesFiles(web);
web.Close();
}

siteCollection.Close();
}

Console.WriteLine("Content Editor WebPart links update completed!");
}

/// <summary>
/// Update URL in content editor WebPart
/// </summary>
static void UpdateContentEditorWebPart(SPLimitedWebPartManager wpManager, ContentEditorWebPart contentEditor)
{
string origContent = contentEditor.Content.InnerText;
if (origContent.Contains(hrefLinkTeReplaced) || origContent.Contains(srcLinkToBeReplaced))
{
XmlDocument xmlDoc = new XmlDocument();
XmlElement xmlElement = xmlDoc.CreateElement("HtmlContent");
xmlElement.InnerText = origContent.Replace(hrefLinkTeReplaced, "href=\"" + newUrl).Replace(srcLinkToBeReplaced, "src=\"" + newUrl);
contentEditor.Content = xmlElement;
wpManager.SaveChanges(contentEditor);
}
}

/// <summary>
/// Update files in sites' root folder
/// </summary>
static void UpdateWebRootFolderFiles(SPWeb web)
{
using (web)
{
// Loop through all files in root folder
if (web.RootFolder.Files != null)
{
foreach (SPFile webRootFile in web.RootFolder.Files)
{
try
{
if (webRootFile.Url.ToLower().EndsWith(".aspx"))
{
using (SPLimitedWebPartManager wpManager = webRootFile.GetLimitedWebPartManager(PersonalizationScope.Shared))
{
foreach (System.Web.UI.WebControls.WebParts.WebPart webPart in wpManager.WebParts)
{
if (webPart != null && webPart.GetType().ToString().Contains("ContentEditorWebPart"))
{
ContentEditorWebPart contentEditor = (ContentEditorWebPart)webPart;
UpdateContentEditorWebPart(wpManager, contentEditor);
}
}
}
}
}
catch (Exception ex)
{
Console.WriteLine(string.Format("Error occurs when updating {0} : {1}", webRootFile.ServerRelativeUrl, ex.Message));
}
}
}
}
}

/// <summary>
/// Update Publishing pages
/// </summary>
static void UpdatePagesFiles(SPWeb web)
{
SPList list = web.Lists.TryGetList("Pages");
if (list == null)
return;

SPFile page = null;
foreach (SPListItem listItem in list.Items)
{
if (!listItem.Url.ToLower().EndsWith(".aspx"))
continue;
try
{
page = web.GetFile(web.Url + "/" + listItem.Url);
bool needToUpdate = false;
using (SPLimitedWebPartManager wpManager = page.GetLimitedWebPartManager(PersonalizationScope.Shared))
{
foreach (System.Web.UI.WebControls.WebParts.WebPart webPart in wpManager.WebParts)
{
if (webPart.GetType().ToString().Contains("ContentEditorWebPart"))
{
ContentEditorWebPart contentEditor = (ContentEditorWebPart)webPart;

string content = contentEditor.Content.InnerText;
if (content.Contains(hrefLinkTeReplaced) || content.Contains(srcLinkToBeReplaced))
{
needToUpdate = true;
}
}
}
}
if (needToUpdate)
{
if (page.CheckOutType != SPFile.SPCheckOutType.None)
page.UndoCheckOut();
page.CheckOut();

string webPartTitles = string.Empty;
using (SPLimitedWebPartManager wpManager = page.GetLimitedWebPartManager(PersonalizationScope.Shared))
{
foreach (System.Web.UI.WebControls.WebParts.WebPart webPart in wpManager.WebParts)
{
if (webPart != null && webPart.GetType().ToString().Contains("ContentEditorWebPart"))
{
ContentEditorWebPart contentEditor = (ContentEditorWebPart)webPart;
UpdateContentEditorWebPart(wpManager, contentEditor);
}
}
}

page.CheckIn("Replace hard-coded URL for content editor web part:" + webPartTitles);
page.Publish("Replace hard-coded URL for content editor web part:" + webPartTitles);
}
}
catch (Exception ex)
{
Console.WriteLine(string.Format("Error occurs when updating {0} : {1}", page.ServerRelativeUrl, ex.Message));
}
}
}
}
}

Wednesday, February 15, 2012

SharePoint 2010 Solution Package Redeployment After Site Extended

Originally we had identical SharePoint 2010 setup in production and staging environments, and both were using the same URLs. In order to visit the staging environment, we need to change machine’s hosts file to point to staging servers. However some business people who need to test the staging server simply don’t have permission to change their hosts file by their own. So we decided to separate the production and staging URLs, one is production.company.com the other is staging.company.com.

When the new DNS entries for staging servers were ready, we started setting up the SharePoint Alternate Access Mapping (AAM) for staging servers. One requirement was that all access needs to be secure so we needed to extend the original web application. Following are steps of the configuration:

1. Open up central admin, go to application management, select the web application and click Extend button on the ribbon

2. In the popup window type following:
  • a. Port: 443
  • b. Host Header: staging.company.com
  • c. Zone: Intranet
  • d. Other as default

3. Go to Application Management -> Configure alternate access mappings -> Edit Public Zone URLs, select the web application and change http://staging.company.com:443 to https://staging.company.com

4. For each front-end server, open up the IIS manager and locate the newly extended site, write down the site ID something like 34561234, the open a command prompt as administrator:

C:\inetpub\AdminScripts>cscript adsutil.vbs set /w3svc/34561234/SecureBindings ":443:staging.company.com"

For more about SSL certificate setup refer to this and this.

5. Go back to IIS manager, select the extended site, and click Edit Bindings. Delete the http binding without SSL certificate and keep the other https one, and then start the IIS site (it’s stopped by default)

6. Optionally copy the original web.config to the extended IIS site if your solution packages are not taking care of all web.config changes.

7. Optionally set the hosts file so that the new DNS entries are pointing to itself, if you have a multiple front-end server farm and NTLM authentication is used. The service calls inside webpart or custom code could possibly route to other front-end server which could lead to the double-hop authentication issue (refer to this). Hosts file setup ensures those service calls always getting to local machine.

The story wasn't stopping yet. We noticed quite a few custom webparts and applications are not working properly after the Web Application is extended. Finally we found SharePoint would redeploy those farm solution packages that have content (such as dll) with deploy target of WebApplication. The redeployment sequence is random which would lead to some problem. In our case, the dll included in the one solution package overrides the newer dll in another solution package. So we redeployed all solution packages with proper order and then the issues were gone.

Wednesday, January 18, 2012

Display Published Date in SharePoint Search Result

In SharePoint search result, the last modified date of an articel (page) is displayed after the page link by default:


How to change this default behavior? Let's say, display the date from a page's column (field) named "Published Date". You can do it without any coding! Following are the configuration steps to achieve this:

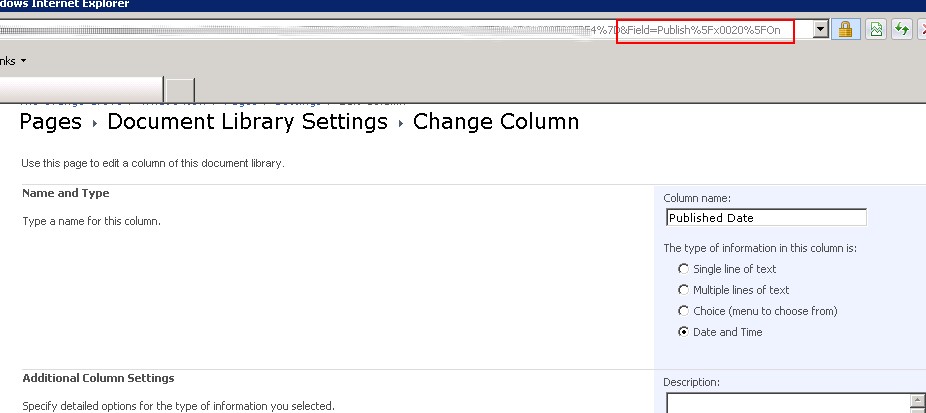
1. Verify the property internal name. You can go the library setting page, click the "Published Date" column, search the "Field" query string inside the URL, and that's column's internal name. It's "Publish%5x0020%5On":


2. Make that "PublishDate" property enable for search result web part to display:
2.1. Open SharePoint Centra Admin -> Manage Application -> Manage Service Application -> Search Application
2.2. Click "Metadate Properties" under "Queries and Results" category on the left panel
2.3. Click "New Managed Property" on the tool bar
2.4. Type "PublishDate" as property name, add "ows_Published_x0020_On" to the mapping, check "Allow this property to be used in scopes" and "Add managed property to custom results set retrieved on each query"


3. Re-crawl the whole content: click "Content Sources" under Crawling category, select the target content source and click "Start Full Crawl". Wait for crawling to be completed.

4. Update Search Core Result WebPart on search result page to display the newly added search property. Because not all content has such column (field), we need to conditionally display this field if it exists, otherwise show the original last modified date.


4.1. Edit the "Search Core Resul" WebPart on the search page, under "Display Properties" category, uncheck "Use Location Visualization".
4.2. Copy the value of "Fetched Proerpties" and paste it to a notepad, add <column name="PublishDate"> in front of <column name="Write"> then paste back the whole string (one line) as "Fetched Proerpties" value, something like:
<root xmlns:xsi="http://www.w3.org/2001/XMLSchema-instance"><Columns><Column Name="WorkId"/>...
<Column Name="PublishDate"/><Column Name="Write"/>...
4.3. Click "XML Editor", search for:
<xsl:call-template name="DisplayString">
<xsl:with-param name="str" select="write"></xsl:with-param>
</xsl:call-template>
Replaced by:
<xsl:choose>
<xsl:when test="string-length(publishdate) &gt; 0">
<xsl:call-template name="DisplayString">
<xsl:with-param name="str" select="publishdate"></xsl:with-param>
</xsl:call-template>
<xsl:otherwise>
<xsl:call-template name="DisplayString">
<xsl:with-param name="str" select="write"></xsl:with-param>
</xsl:call-template>
</xsl:otherwise>
</xsl:when></xsl:choose>
Now the "Published Date" is shown for those pages with this field defined, and last modified date displays for those pages without this field.

Note that "publishdate" in the XSLT condition is all lower case. I defined it as "PublishDate" in Search property, and I assumed it remains the same in search return. But that's not the case. Search application always returns a xml with all lower case property name. This can be verified by showing the original search result. In order to see the oringal search result, simply use the following xml for the Search Core Result WebPart:
<xsl:stylesheet version="1.0" xmlns:xsl="http://www.w3.org/1999/XSL/Transform">
<xsl:output method="xml" version="1.0" encoding="UTF-8" indent="yes"/>
<xsl:template match="/">
<xmp><xsl:copy-of select="*"/></xmp>
</xsl:template>
</xsl:stylesheet>
The screen-shot of the original search return:

Friday, December 23, 2011

SharePoint 2010 Migration

After a few months of preparation and testing we finally upgraded our production portal from MOSS 2007 to SharePoint 2010 about two weeks ago. There’s no major issue reported/found so far, and the overall feedback from the end users is positive.

The database approach was used in our migration, i.e. install a new SharePoint 2010 farm and mount the old MOSS 2007 databases. The migration process looks straightforward: run preupgradecheck then fix the issues, and run Test-SPContentDatabase then fix the issues, and finally run Mount-SPContentDatabase. Fixing those issues wasn't too hard but just a matter of time.

We had spent quite a lot of effort on content analysis and cleanup with our 60+G of content databases. At the end all our custom WebParts, dlls, user controls and some other SharePoint resources were repackaged into one solution called "SP2010Migration" that only builds one solution package for all.


The SP2010Migration solution package was supposed to deployed only once and that’s all. It shouldn’t be used anymore unless to build a new farm from scratch again. There’s no Feature in the solution package because it may bring trouble in later deployment. So in the future we can still package any WebPart or component into a Feature without concern of Feature conflict.

One interesting thing is that all user controls loaded by SmartParts were still working fine after migration. But we got some issues with the DataFormWebPart. For example the relative link was’t wrong after migration, and we had to write a console app to replace all "{@FileRef}" by "/{@FileRef}" inside each DFWP’s XSLT across the whole farm.

Another DFWP issue seemed to be more confusing where we only saw error in the DFWP page:

Unable to display this Web Part. To troubleshoot the problem, open this Web page in a Microsoft SharePoint Foundation-compatible HTML editor such as Microsoft SharePoint Designer. If the problem persists, contact your Web server administrator. Correlation ID:…

By Correlation ID we could easily find out the error detail from ULS log:

Error while executing web part: System.StackOverflowException: Operation caused a stack overflow. At Microsoft.Xslt.NativeMethod.CheckForSufficientStack() at SyncToNavigator(XPathNavigator , XPathNavigator ) at …

I tested the setting locally and everything seemed to be okay. How come a out-of-box SharePoint WebPart got a “stack overflow” error in production and it used to be working fine before migration? It turned out that time-out scenario occurred internally during XSL transform process in DFWP in production environment. That time-out threshold is only 1-second which means anything longer than 1 second will cause the error. We have a big list in our production server and the DFWP displays hundreds of rows in a big table which caused the time-out error.

That’s something new in SharePoint 2010 and also something annoying by Microsoft. It's great to introduce new stuff but it's also important to keep old stuff work right? Why not just turned off that new “time-out” feature by default and let end users to have an option to set it?

The worst thing is that there's no way to change that 1-second time-out setting! Microsoft provided "three solutions" for this issue:

1.) Tune XSL to get shorter transform time.
2.) Don't use DFWP instead use other WebPart.
3.) Write code to inherit DFWP and build your own.

Following the instruction we finally got the DFWP back after tweaking its settings, e.g. less columns and smaller page size. That's of course not an ideal way to solve the problem. We hope Microsoft could provide a better solution on this issue.

[2012-3 Update]: The time-out value of a DFWP now is configurable in Farm level with latest SharePoint CU. Refer to this.

Wednesday, December 07, 2011

A SharePoint Double Hop Issue

A SharePoint DataForm Web Part is not working properly sometimes after migrating from SharePoint 2007 to a SharePoint 2010 environment. Oringal ShaerPoint 2007 farm only has one front-end server and the new SharePoint 2010 farm includes two front-end servers and one application server. NTLM authentication is used in both SharePoint 2007 and 2010 environment.

The DataForm web part is working okay in SharePoint designer, and it's invoking the SharePoint Profile Service to retrieve some user profile data.

The ULS log shows (401) Unauthorized error:


w3wp.exe (0x1150) Error while executing web part: System.Net.WebException: The remote server returned an error: (401) Unauthorized. at System.Net.HttpWebRequest.GetResponse() at ....


Apparently that service call was routed to the other front-end server and then got access error. We verify that the SharePoint Web Services in both front-end servers do have anonymous access enabled. So why access error still happened?

Since the user has already authenticated to the site, the service call inside the DataForm webpart would automatically impersonate the original user instead of accessing outside as anonymous user, and that service call would fail in the other front-end server due to the NTLM setup in our environment. This is a typical NTLM double-hop issue.

Why the service call is not ending at local machine? Well it does sometimes and that's why it works sometimes. The problem is caused by the round robin DNS setup. To resolve the problem, simply add related entries to front-end servers' hosts file with domain name(s) pointing to local server. Then such service calls will always go to local machine and the double-hop issue will be gone.

Wednesday, November 30, 2011

Using Powershell to Update SharePoint 2010 User Profile

In previous post a small piece of code demos a simple way to update the user profile picture by object model. The same task can also be achieved easily using Powershell:
$userAccount = "SP2010\test"
$newPictureURL = "http://SP2010Site/Photos/test.jpg"
$site = Get-SPSite("http://SP2010Site")
$context = Get-SPServiceContext $site
$profileManager = New-Object Microsoft.Office.Server.UserProfiles.UserProfileManager($context)
$userProfile = $profileManager.GetUserProfile($userAccount)
$userPicture["PictureURL"].Value = $newPictureURL
$userProfile.Commit()
Actually there's some improvement in SharePoint 2010 user photo management. Instead of one picture being used everywhere in SharePoint 2007, SharePoint 2010 maintains three different profile pictures to be used in different contexts. Three images will be created when a user uploaded a picture which are stored in a library folder inside MySite's root site: http://mysite/User Photos/Profile Picture. You can get more detailed SharePoint 2010 photo management from this MSDN blog.

What about a SharePoint 2010 environment upgraded from SharePoint 2007? All the user pictures are still pointing to the old location. However, you can use following Powershell script to migrate all those pictures:
Update-SPProfilePhotoStore -MySiteHostLocation http://SPMySite/
What it does is rebuild all user pictures from previous verion. For example, a user with AD account of SP2010\test has the picture location of http://sp2010site/Profile Pictures/test.jpg. Then three images will be created after above Powershell command execution:
1. http://mysite/User Photos/Profile Pictures/SP2010_test_LThumb.jpg
-- size: 148x148 pixel
-- exmaple of usage: mysite title image
2. http://mysite/User Photos/Profile Pictures/SP2010_test_MThumb.jpg
-- size: 96x96
-- exmaple of usage: people search result image
3. http://mysite/User Photos/Profile Pictures/SP2010_test_SThumb.jpg
-- size: 36x36 small image
-- exmaple of usage: mysite colleague photo

One common scenario is to update test accounts' email address so testers/developers can get the email notification in the test environment. User's email address used by SharePoint to send the email notification is not directly from the user profile, instead it's from a user record in the User Information List tied to top site collection (the user info list data could be overridden by user profile service). In order to change a user's email address you have to modify the list item value in the user information list for a given site:
$web = Get-SPWeb http://sp2010site
$userInfoList = $web.Lists | where { $_.Title -eq "User Information List" }
$userAccount = $userInfoList.Items | where { $_["Account"] -eq "sp2010\test" }
$userAccount["Work e-mail"] = "whatevername@whatever.com"
$userAccount.Update()
Be aware that the modification could be overridden by user profile service's scheduled synchronization if you have user profile service enabled.

This is not related to user profile, but it's also common issue in a migrated SharePoint environment. A SharePoint 2010 farm migrated from SharePoint 2007 without visual upgrade will keep the old UI. But you will notice a new site created after migration (root site or subsite) would always use the new SharePoint 2010 UI. In case you just want to keep the old UI and don't have a short-term plan for UI upgrade, how to revert the new created site back to previous version? Simply a few lines of script:
$web = Get-SPWeb http://sp2010site/newsite
$web.UIVersion = 3
$web.MasterUrl = "/newsite/_catelogs/masterpage/homepagev3.master"
$web.AlternateCssUrl = "newsite/style library/customlayout.css"
$web.Update()

For more hands-on Powershell scripts used in SharePoint environment, refer to this codeplex project complied by a few SharePoint gurus.

Tuesday, November 29, 2011

SharePoint Server 2010 User Profile

There's no big change between SharePoint Server 2010 and MOSS 2007 in terms of User Profile management. The MOSS 2007 user profile database attached to SSP (Shared Service Provider) can be mounted directly to SharePoint Server 2010 User Profile Service Application. The mount process actually upgrades the MOSS 2007 user profile database. You will notice some new tables and columns are added in the backend database. Following image shows the scheme change made on the UserProfile_Full table in user profile database.

The User Information List is still there in each top site collection where SharePoint foundation manitains the basic user data. A record will be added to the User Information List when a user or a group is first referenced by the SharePoint environment. The initial User Information data, like title, user login, email address, etc., are imported from the authentication provider such as Active Directory. In SharePoint Foundation 2010 the User Information List is updated when you modify user info through "My Settings". All User Information List data are stored in the UserInfo table in content database:

Once the User Profile Service is enabled in SharePoint Server 2010, the User Information List became read-only for end user except the "Mobile Number" property, and user profile database is updated when the user modifying "My Settings", instead of the User Information List (UserInfo table). A timer job is responsible for replicating the user profile data to User Information data for each top site collection, and User Information List data will be overridden unless the corresponding property is not set to "Replicable" in User Profile Service:

Sometime it would cause some confusion when the User Information data are not synced to the User Profile data. Remember regular SharePoint sites always get user info from the User Information List but the User Profile content are the original data source when User Profile Service is enabled.

There's slight difference in SharePoint 2010 when accessing or updating the user profile data comparing with SharePoint 2007. In MOSS 2007, Microsoft.Office.Server.ServiceContext is available and you can create a UserProfileManager object from a ServiceContext. In SharePoint 2010 ServiceContext is replaced by the new Microsoft.SharePoint.SPServiceContext:

void UpdateUserProfiles(string siteUrl)
{
string userName = null;
using (SPSite spSite = new SPSite(siteUrl))
{
//ServiceContext is obsolete in SharePoint 2010
//UserProfileManager userProfileManager = new UserProfileManager(ServerContext.GetContext(spSite));

UserProfileManager userProfileManager = new UserProfileManager(SPServiceContext.GetContext(spSite));

foreach (UserProfile profile in userProfileManager)
{
string account = Convert.ToString(profile[PropertyConstants.AccountName].Value);
if (string.IsNullOrEmpty(account) || account.IndexOf("\\") <= 0)
continue;
userName = account.Substring(account.IndexOf("
\\"));
profile[PropertyConstants.PictureUrl].Value = GetUserPhotoLocation(userName);
profile.Commit();
}
}
}
The method simply goes through each user profile, and updates the user photo by some custom logic (GetUserPhotoLocation method). Notice Microsoft.Office.Server.UserProfiles has become a separate dll in SharePoint 2010, so in order to get above code compiled you need to add Microsoft.Office.Server and Microsoft.Office.Server.UserProfiles to the references.