Similar to Facebook Connect (See previous article), Windows Live ID is also an authentication model with broader services available. It is a service that assigns cross-site identifiers to users throughout the Internet. From Microsoft’s definition: "The Windows Live ID service (formerly known as the Passport Network) is the identity and authentication system provided by Windows Live. More than 380 million users have credentials that work with Windows Live ID."
There are many Live services available from Microsoft using Windows Live ID. Microsoft have paid a lot of effort to consolidate all Live services in one platform called Live Framework (LiveFX), and offers an uniform way for programming Live Services from a variety of platforms, programming languages, applications and devices. For a simple contact sharing, there is no need to jump into LiveFX.
Three main Live SDKs are available for developers to integrate third-party applications with Live services:
The Windows Live ID Client 1.0 SDK makes it easy to start developing identity-aware client (desktop) applications.
The Windows Live ID Delegated Authentication SDK for Application Providers helps to get permission to access users' information on Windows Live services.
The Windows Live ID Web Authentication SDK provides a platform-independent interface and helps to authenticate users. This only offers distributed authentication without data sharing.
We will use the Windows Live ID Delegated Authentication SDK to access user’s contact list as an example.
There is an important consent concept for Live data access. The application requests data from Live service, Live service requires user to sign in, and will prompt user to grant the consent of data sharing. If user agrees to that, an encrypted consent token will be sent to the consent handler (channel file) in the application by query string, consent handler is able to decrypt the consent token because it knows the secret code generated during Live service registration (see next section for details). With a valid consent token, the application will have permission to access the Live service data. The detail of how it works is well described in http://msdn.microsoft.com/en-us/library/cc287613.aspx. Following figure illustrates the information flow of delegated authentication with consent token.
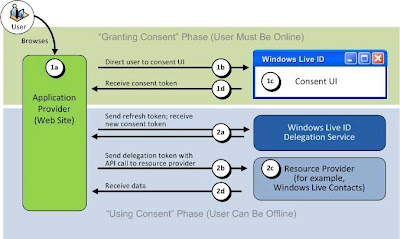
Note that all messages are passing through URL or client Cookies in above figure.
Register Windows Live Service
Like Facebook Connect, in order to user Windows Live Service, we need to register our application with Windows Live services which now is part of Azure services.
Go to http://lx.azure.microsoft.com, login with valid Windows Live ID, and there shows the Azure Services Developer Portal:
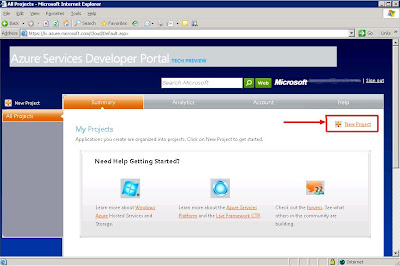
Click New project button and select Live Service Existing APIs. Then in the project creation page, input whatever project name and description, but make sure the Domain and Return URL are matching the application settings because they are used for cross domain call-back communication. Here we input windowslivetest.com as domain and http://windowslivetest.com/ as Return URL. Once click the Create button a new Windows Live application will be registered.
Remember Applicaiton ID and Secret key entries on the summary page are very important because we need to use them in our application to use the Windows Live service. We need to write them down and will put them in our web application configuration file web.config later.
At this point the Windows Live service registration for an application is completed. In next section we will build a simple web application to retrieve data from Windows Live service we just registered.
Getting Windows Live Data
After the registration on Windows Live service, we can build an application to consume Windows Live data. Here we create a web application to retrieve user's contact list and show the name and email for each contact on the page. For more details to use Windows Live server, refer to SDK samples and the Windows Live Data Interactive SDK (https://dev.live.com/livedata/sdk/Default.aspx).
Before creating the page, we need to copy the WindowsLiveLogin.cs file from SDK to our solution, which includes a helper class named WindowsLiveLogin.
We also need to create a few application settings in web.config file:
<appSettings>Application ID and Secret come from the Windows Live service registration in previous section. The privacy page (LivePrivacy.htm) can be empty, and the channel file WindowsLiveHandler.aspx is for cross-domain communication. It is responsible for setting the consent token to cookie and redirecting to main page (no front end html content):
<!-- Windows Live Settings -->
<add key="wll_appid" value="000000004001710E"/>
<add key="wll_secret" value="yQvEotqjpxJPHW9jDAtc9ckepX2lZirK"/>
<add key="wll_securityalgorithm" value="wsignin1.0"/>
<add key="wll_returnurl" value="http://windowslivetest.com/WindowsLiveHandler.aspx" />
<add key="wll_policyurl" value="http://windowslivetest.com/LivePrivacy.htm" />
</appSettings>
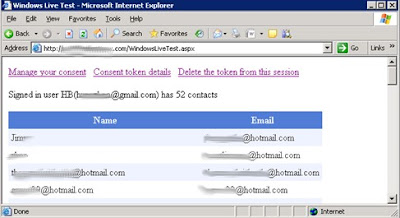
namespace WebThe main page (WindowsLiveTest.aspx) checks the consent token from cookie. If the token is valid, it will connect to the Windows Live service with the consent token, parse the XML return using Linq to XML, and show the contacts’ name and email in a GridView:
{
public partial class WindowsLiveHandler : System.Web.UI.Page
{
// Initialize the WindowsLiveLogin module.
static WindowsLiveLogin WLLogin = new WindowsLiveLogin(true);
protected void Page_Load(object sender, EventArgs e)
{
HttpRequest request = HttpContext.Current.Request;
HttpResponse response = HttpContext.Current.Response;
string appctx = "~/WindowsLiveTest.aspx";
string action = request["action"];
if (action == "delauth")
{
// Get the consent token
WindowsLiveLogin.ConsentToken ct = WLLogin.ProcessConsent(request.Form);
HttpCookie authCookie = new HttpCookie("delauthtoken");
if (ct != null)
{
authCookie.Value = ct.Token;
authCookie.Expires = DateTime.Now.AddYears(10);
}
else
{
authCookie.Expires = DateTime.Now.AddYears(-10);
}
response.Cookies.Add(authCookie);
response.Redirect(appctx);
response.End();
}
else
{
response.Redirect(appctx);
response.End();
}
}
}
}
namespace WebThe page's html markup:
{
public partial class _WindowsLive : System.Web.UI.Page
{
// Initialize the WindowsLiveLogin module.
static WindowsLiveLogin wll = new WindowsLiveLogin(true);
protected WindowsLiveLogin.ConsentToken ConsentToken = null;
/// <summary>
/// Handles the page load event
/// </summary>
protected void Page_Load(object sender, EventArgs e)
{
HttpCookie authCookie = HttpContext.Current.Request.Cookies["delauthtoken"];
// If the raw consent token has been cached in a site cookie,
// process it and extract the consent token.
if (authCookie != null)
{
string t = authCookie.Value;
ConsentToken = wll.ProcessConsentToken(t);
if ((ConsentToken != null) && !ConsentToken.IsValid())
{
ConsentToken = null;
return;
}
string uri = "https://livecontacts.services.live.com/users/@L@" +
ConsentToken.LocationID + "/rest/LiveContacts";
HttpWebRequest request = (HttpWebRequest)WebRequest.Create(uri);
request.ContentType = "application/xml; charset=utf-8";
request.Method = "GET";
// Add the delegation token to a request header.
request.Headers.Add("Authorization", "DelegatedToken dt=\"" + ConsentToken.DelegationToken + "\"");
//Issue the HTTP GET request to Windows Live Contacts.
HttpWebResponse response = (HttpWebResponse)request.GetResponse();
// Create XDocument by returned XML
StreamReader readStream = new StreamReader(
response.GetResponseStream(), System.Text.Encoding.UTF8);
XmlReader xmlReader = XmlReader.Create(readStream);
XDocument xDoc = XDocument.Load(xmlReader);
response.Close();
// Summary format:
//Signed in user {username}({email}) has {count} contacts
if (xDoc.Descendants("Owner").Elements("WindowsLiveID").Any())
{
string userInfo = string.Format(
"<p>Signed in user {0}({1}) has {2} contacts</p>",
xDoc.Descendants("Owner").Elements("Profiles").Elements("Personal").Elements("DisplayName").Any() ?
xDoc.Descendants("Owner").Elements("Profiles").Elements("Personal").Elements("DisplayName").First().Value : "",
xDoc.Descendants("Owner").Elements("WindowsLiveID").First(),
xDoc.Descendants("Contact").Count());
lblUserInfo.Text = userInfo;
}
// Query contact display name and email address
var contacts = from contact in xDoc.Descendants("Contact")
select new
{
Name = contact.Elements("Profiles").Elements("Personal").Elements("DisplayName").Any() ?
contact.Element("Profiles").Element("Personal").Element("DisplayName").Value : string.Empty,
Email = contact.Elements("Emails").Elements("Email").Elements("Address").Any() ?
contact.Element("Emails").Element("Email").Element("Address").Value : string.Empty
};
// Bind list of display name and email address to GridView
GridView1.DataSource = contacts;
GridView1.DataBind();
divConsent.Visible = true;
}
else
{
string appSite = "https://" + Request.Url.Host;
string delegationURL = wll.GetConsentUrl("ContactsSync.FullSync");
string grantLink = string.Format("<a href='" + delegationURL +
"'>Click to grant this application access to your Windows Live data</a>", appSite);
Page.Response.Write(grantLink);
}
}
}
}
<%@ Page Language="C#" AutoEventWireup="true" CodeBehind="WindowsLiveTest.aspx.cs" Inherits="Web._WindowsLive" %>There is no consent token available when we first visit the page, and the grant access like is displayed:
<!DOCTYPE HTML PUBLIC "-//W3C//DTD HTML 4.01 Transitional//EN">
<html>
<head>
<title>Windows Live Test</title>
<script src="Scripts/jquery-1.3.2.min.js" type="text/javascript"></script>
<script type="text/javascript">
$(document).ready(function() {
$("#tblConsentDetail").hide()
});
function toggleConsentDetail() {
$("#tblConsentDetail").toggle();
}
</script>
</head>
<body>
<form id="form1" runat="server">
<div id="divConsent" runat="server" visible="false">
<a href="https://consent.live.com/ManageConsent.aspx">Manage your consent</a>
<a href="#" onclick="javascript:toggleConsentDetail();">Consent Token Details</a>
<a href="WindowsLiveHandler.aspx?action=delauth" >Delete the token from this session</a><br />
<asp:Label ID="lblUserInfo" runat="server"></asp:Label>
<table id="tblConsentDetail" cellpadding="5">
<tr valign="top"><td style="width:300px;">LID</td><td>
<%=ConsentToken.LocationID%></td></tr>
<tr valign="top"><td>Delegation token</td><td>
<%=ConsentToken.DelegationToken%></td></tr>
<tr valign="top"><td>Refresh token</td><td>
<%=ConsentToken.RefreshToken%></td></tr>
<tr valign="top"><td>Expiry</td><td>
<%=ConsentToken.Expiry%></td></tr>
<tr valign="top"><td>Offers</td><td>
<%=ConsentToken.OffersString%></td></tr>
<tr valign="top"><td>Context</td><td>
<%=ConsentToken.Context%></td></tr>
<tr valign="top"><td>Token</td><td>
<%=ConsentToken.Token%></td></tr>
</table>
</div>
<br />
<asp:GridView ID="GridView1" runat="server" GridLines="None" CellPadding="5" ForeColor="#333333" >
<RowStyle BackColor="#EFF3FB" />
<FooterStyle BackColor="#507CD1" Font-Bold="True" ForeColor="White" />
<PagerStyle BackColor="#2461BF" ForeColor="White" HorizontalAlign="Center" />
<EmptyDataTemplate>
<asp:Label ID="Label1" runat="server">There are no contacts</asp:Label>
</EmptyDataTemplate>
<SelectedRowStyle BackColor="#D1DDF1" Font-Bold="True" ForeColor="#333333" />
<HeaderStyle BackColor="#507CD1" Font-Bold="True" ForeColor="White" />
<EditRowStyle BackColor="#2461BF" />
<AlternatingRowStyle BackColor="White" />
</asp:GridView>
</form>
</body>
</html>
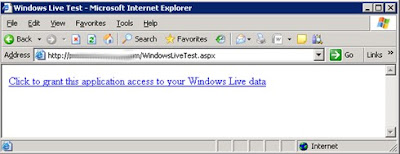
Click the link page will be redirected to the Windows Live login page:
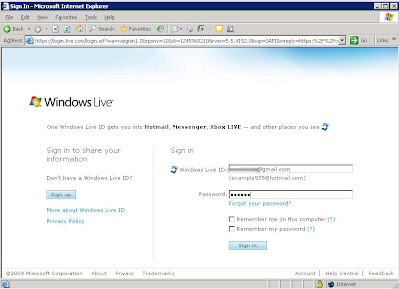
After input valid Windows Live ID and password, an agreement page pops up to let user to confirm the data sharing:
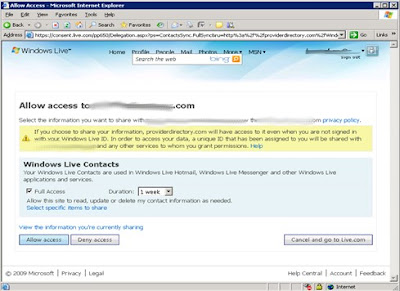
When user clicks the Allow access button, page will direct to our test page (underneath the channel page is called back first). Since the consent token now is available, the test page will show user’s contact:
When the delegated authentication doesn’t work properly, first thing to diagnose the issue is check the error code inside the URL, and look up the details of the error from Live SDK error list page: http://msdn.microsoft.com/en-us/library/cc287686.aspx.
Using Windows Live Contacts Control
In addition to Windows Live service SDK(API), the Windows Live Contacts Control (Beta) (http://dev.live.com/contactscontrol/) abstracts the related functions into a HTML control and makes the whole Windows Live contact sharing much easier to use.
Windows Live Contacts Control does not require registering with Windows Live service, which significantly simplifies the contact import. Just reference two JavaScript files from Windows Live, and declare the Contacts control on an html or aspx page as following:
<!DOCTYPE html PUBLIC "-//W3C//DTD XHTML 1.0 Transitional//EN" "http://www.w3.org/TR/xhtml1/DTD/xhtml1-transitional.dtd">The property and event description of Windows Live Contacts Control is available in http://dev.live.com/contactscontrol/api.aspx. The channel page for cross domain communication is also required. In above case, we create a LiveChannel.htm page:
<html xmlns="http://www.w3.org/1999/xhtml" xmlns:devlive="http://dev.live.com">
<head>
<title>Windows Live Contacts Control Test</title>
<script type="text/javascript" src="https://controls.services.live.com/scripts/base/v0.3/live.js"></script>
<script type="text/javascript" src="https://controls.services.live.com/scripts/base/v0.3/controls.js"></script>
<script type="text/javascript">
function receiveData(contacts) {
var s = "<p>" + contacts.length + " contacts are imported:</p>";
for (var i = 0; i < contacts.length; i++) {
s += "<p>Contact " + (i+1) + "<br>";
for (var j in contacts[i]) {
s += escapeString(j) + ": " + escapeString(contacts[i][j]) + "<br>";
}
s += "</p>";
}
document.getElementById('divStatus').innerHTML = s;
}
function signin() {
document.getElementById('divStatus').innerHTML = "You're logged in!";
};
function signout() {
document.getElementById('divStatus').innerHTML = "You need to log in.";
};
function showerror(msg) {
document.getElementById('divStatus').innerHTML = escapeString(msg);
}
function escapeString(str) {
return str.replace(/&/g, "&").replace(/</g, "<").replace(/>/g, ">").
replace(/\"/g, """).replace(/\'/g, "'");
}
function controlLoad() {
document.getElementById('divStatus').innerHTML = "You need to log in.";
}
</script>
</head>
<body>
<P>Windows Live Contacts Control Test</P>
<devlive:contactscontrol
style="width:280px;height:400px;float:left;margin-right:10px;"
id="ContactsControl"
devlive:privacyStatementURL="LivePrivacy.htm"
devlive:dataDesired="name,firstname,lastname,email,emailpersonal,emailbusiness"
devlive:onData="receiveData"
devlive:onSignin="{signin();}"
devlive:onSignout="{signout();}"
devlive:onError="showerror"
devlive:channelEndpointURL="LiveChannel.htm"
devlive:"controlLoad">
</devlive:contactscontrol>
<div id="divStatus"></div>
</body>
</html>
<html xmlns="http://www.w3.org/1999/xhtml">An empty window similar to Windows Messenger is displayed when the page is first loaded. You click on Signin, and when the login is successful, the popup window will close automatically and the user’s contacts will show on the control:
<head>
<title>Channel</title>
<meta name="ROBOTS" content="NONE" />
<script type="text/javascript">
function doc_loaded() {
try {
var hash = window.location.hash.substr(1);
if (window.location.replace == null)
window.location.replace = window.location.assign;
window.location.replace("about:blank");
var name = hash.split("/")[0];
var win = null;
if (name)
win = window.parent.frames[name];
else
win = window.parent.parent;
win.Microsoft.Live.Channels.Mux._recv_chunk(hash);
}
catch (ex) {
/* ignore */
}
}
</script>
</head>
<body onload="doc_loaded()">
</body>
</html>
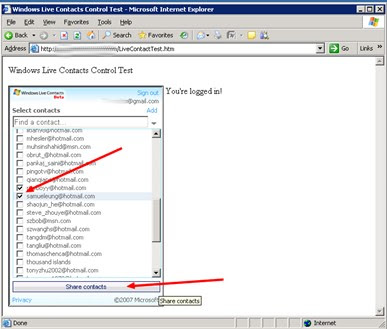
You can select the contacts needed to be shared, and click the Share contacts button inside the control, and then an agreement page will pop up asking the user to confirm the data sharing:
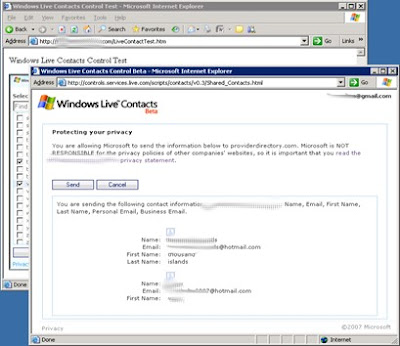
The popup page will close when user clicks Send button, and the contacts are imported to the page hosting the control:
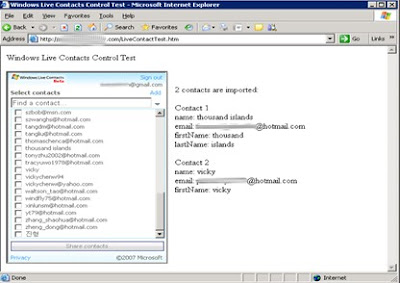
The Windows Live Contacts Control is handy to import email addresses. But be aware that the control is still in Beta phase, and its interface could be changed later.
Known Issues
The local time stamp of browser machine is sent in the request URL for a delegated Live authentication service. Syncing the time of development machine is important for testing. Nowadays many developers are using virtual machine as a development platform, as virtual machines are flexible, easy to maintain and test. But be cautious that virtual machines’ time may not be correct if they are manually turned off and on. The Live services will fail if time variance between servers for Live services and the client machine is too much.
Windows Live ID is upgraded from previous Passport services. It’s still in early 1.0 version, and some of the Live APIs are actually in Beta phase. The bigger picture of Microsoft Azure services have just jumped to the stage in less than a year. I did encounter the unstable services during the tests.
Windows Live Web Authentication API currently is totally separated from Delegated Authentication API. Logging out of Windows Live is a basic function defined in We Authentication but not in Delegated Authentication service. The page will be redirected to http://www.msn.com instead of original application page, if we use the same Web Authentication logout URL in Delegated Authentication.
The workaround to the logout problem can be making a cross domain AJAX call (such as getJSON in jQuery) to the logout URL, or create an invisible iframe for the logout call:
    <script type="text/javascript">
        function logoutLive() {
            var $frame = $("<iframe width='1px' height='1px'
                          src='http://login.live.com/logout.srf?appid=<%=LiveAPPID %>'>");
            $('#divContent').append($frame);
            $.cookie('delauthtoken', null);
            location.reload();
        }
    </script>
<body>
<form id="form1" runat="server">
   <div id="divContent">
        <a href="javascript:logoutLive();">Logout Live</a>
   </div>
</form>
</body>
Conclusion
Windows Live integeration works but it seems not as easy/stable as Facebook Live.


